Zero to Hero with the Field Kit
Complete setup guide for your Jetson Orin Nano Field Kit from unboxing to first boot
Introduction
Welcome to the Jetson Orin Nano Field Kit! This guide will walk you through everything you need to get your kit up and running, from initial setup to ensuring everything works on first boot.
Note: This is a suggested manual - there are many ways to set up and use the Field Kit. This guide provides one recommended approach, but feel free to adapt it to your specific needs and preferences.
First Bootup Guide
Watch this video for a visual walkthrough of the first boot process:
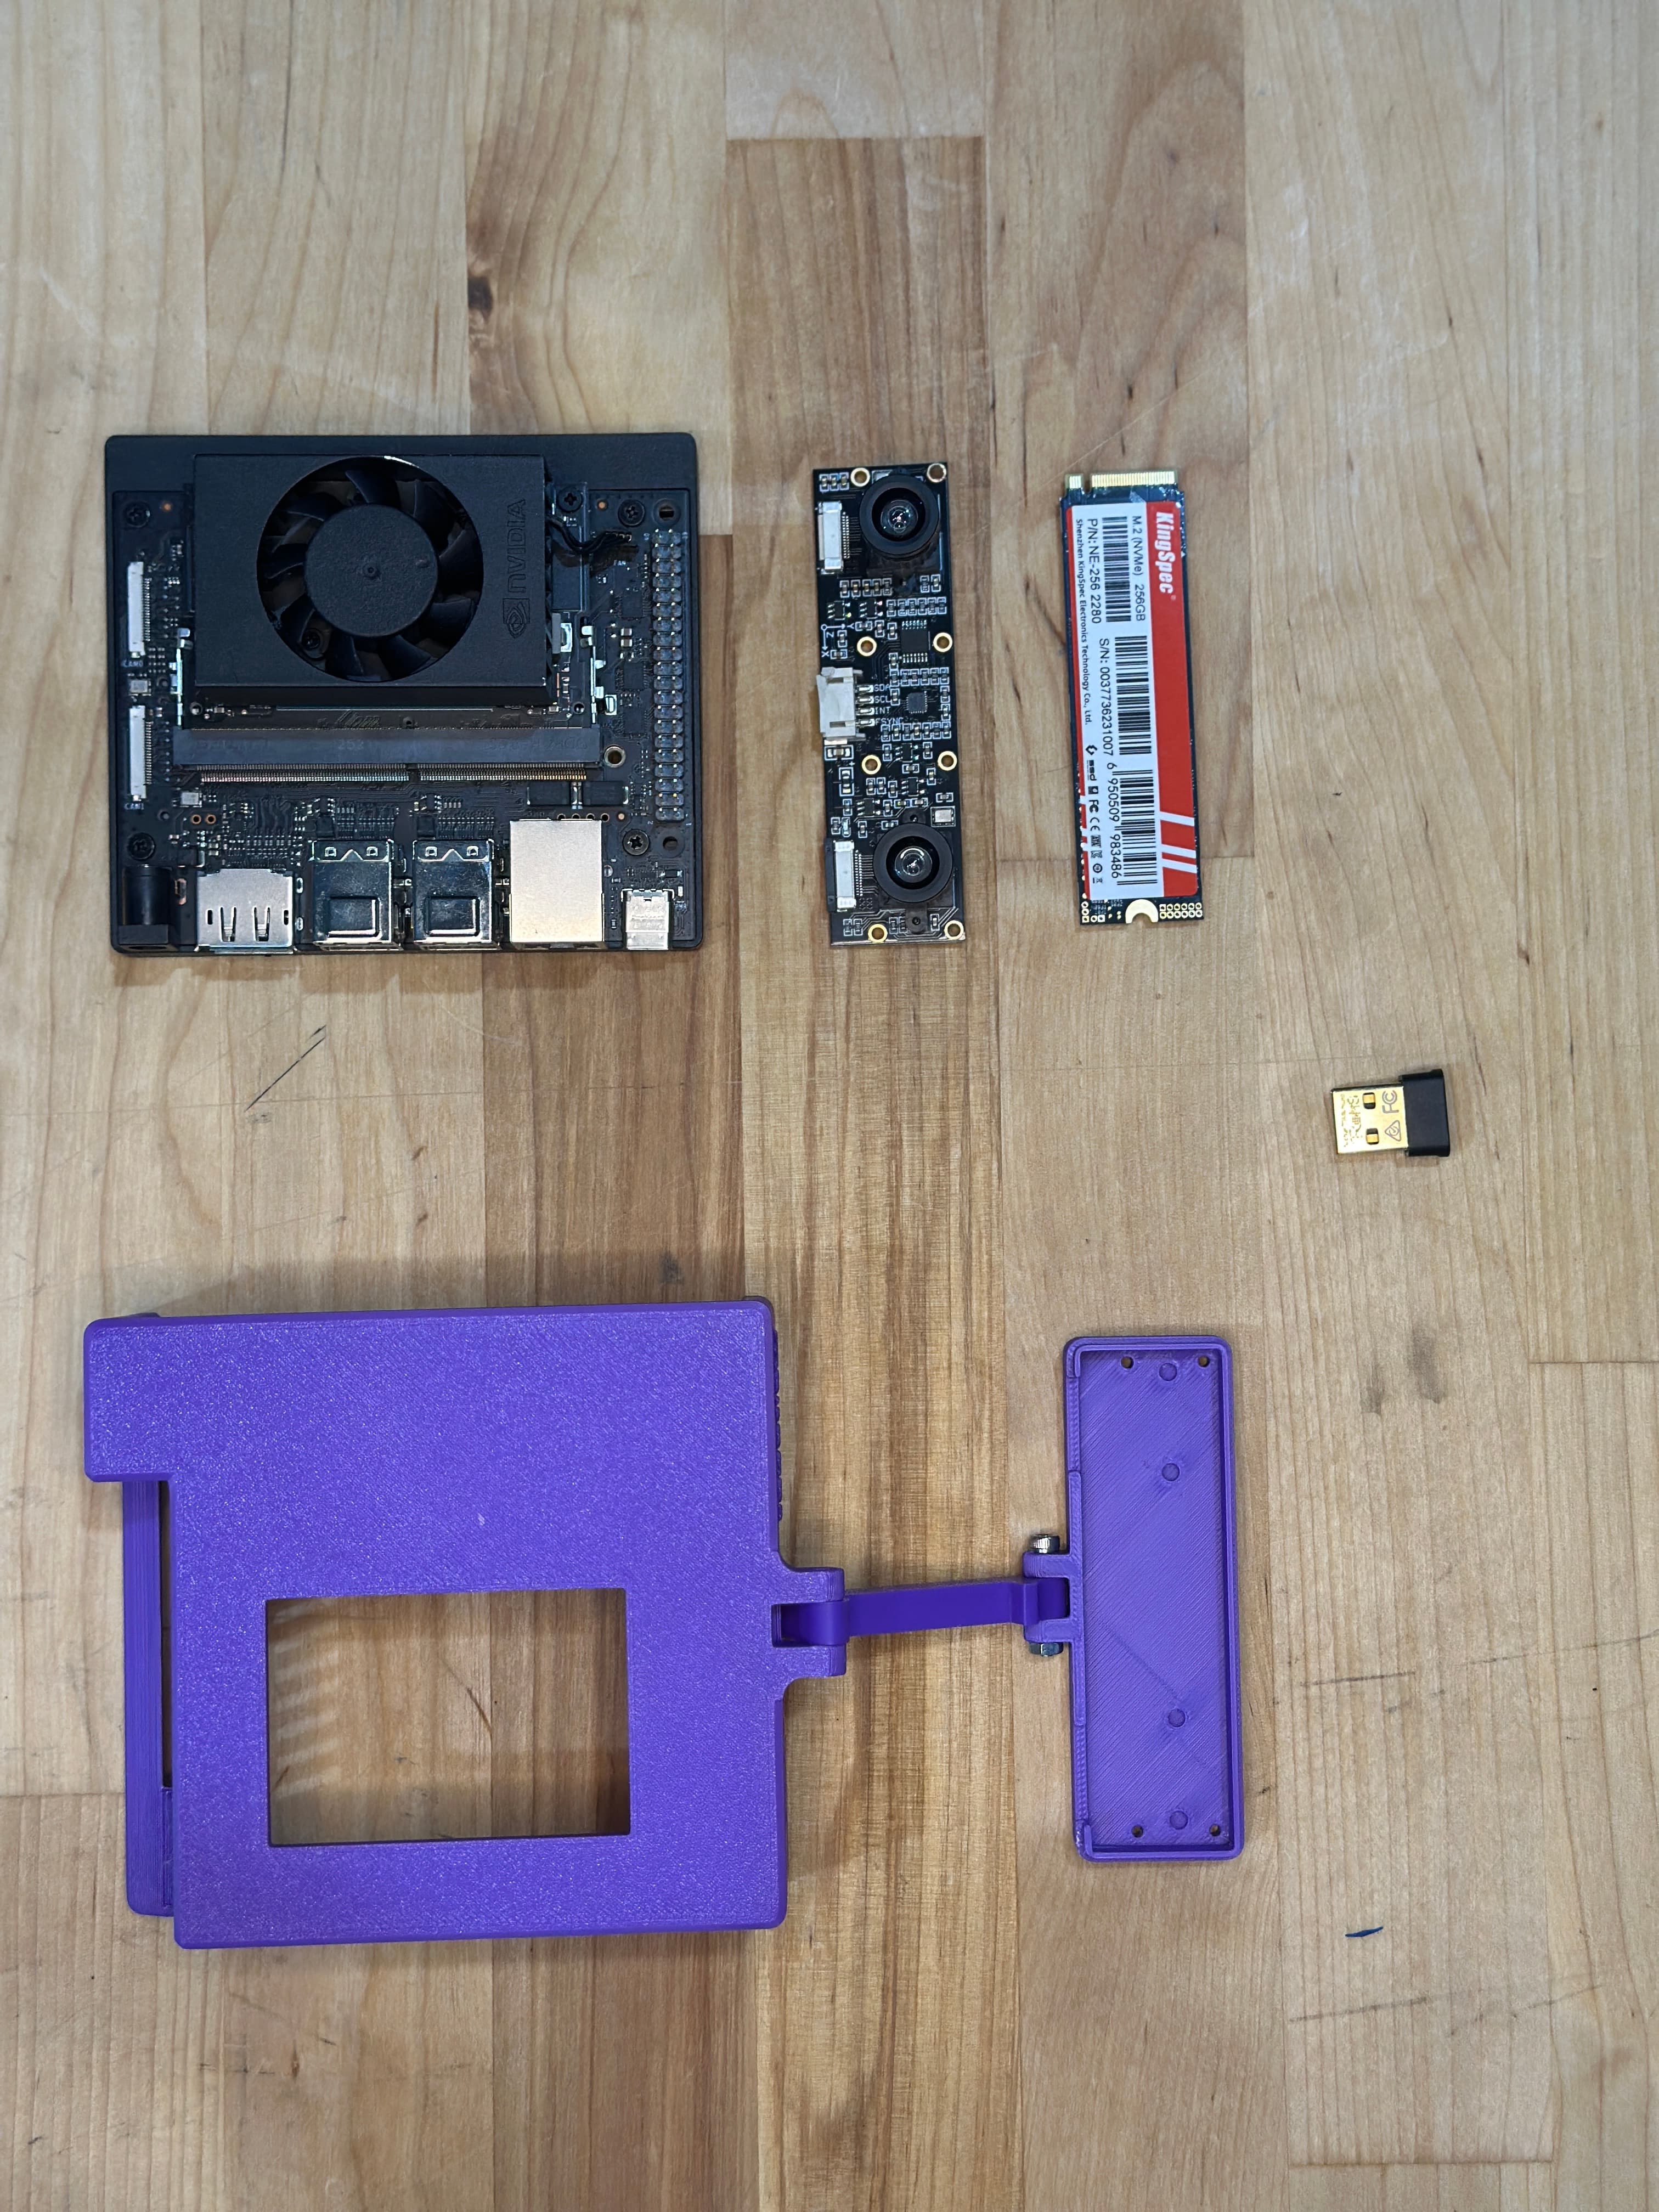
What's in the Box
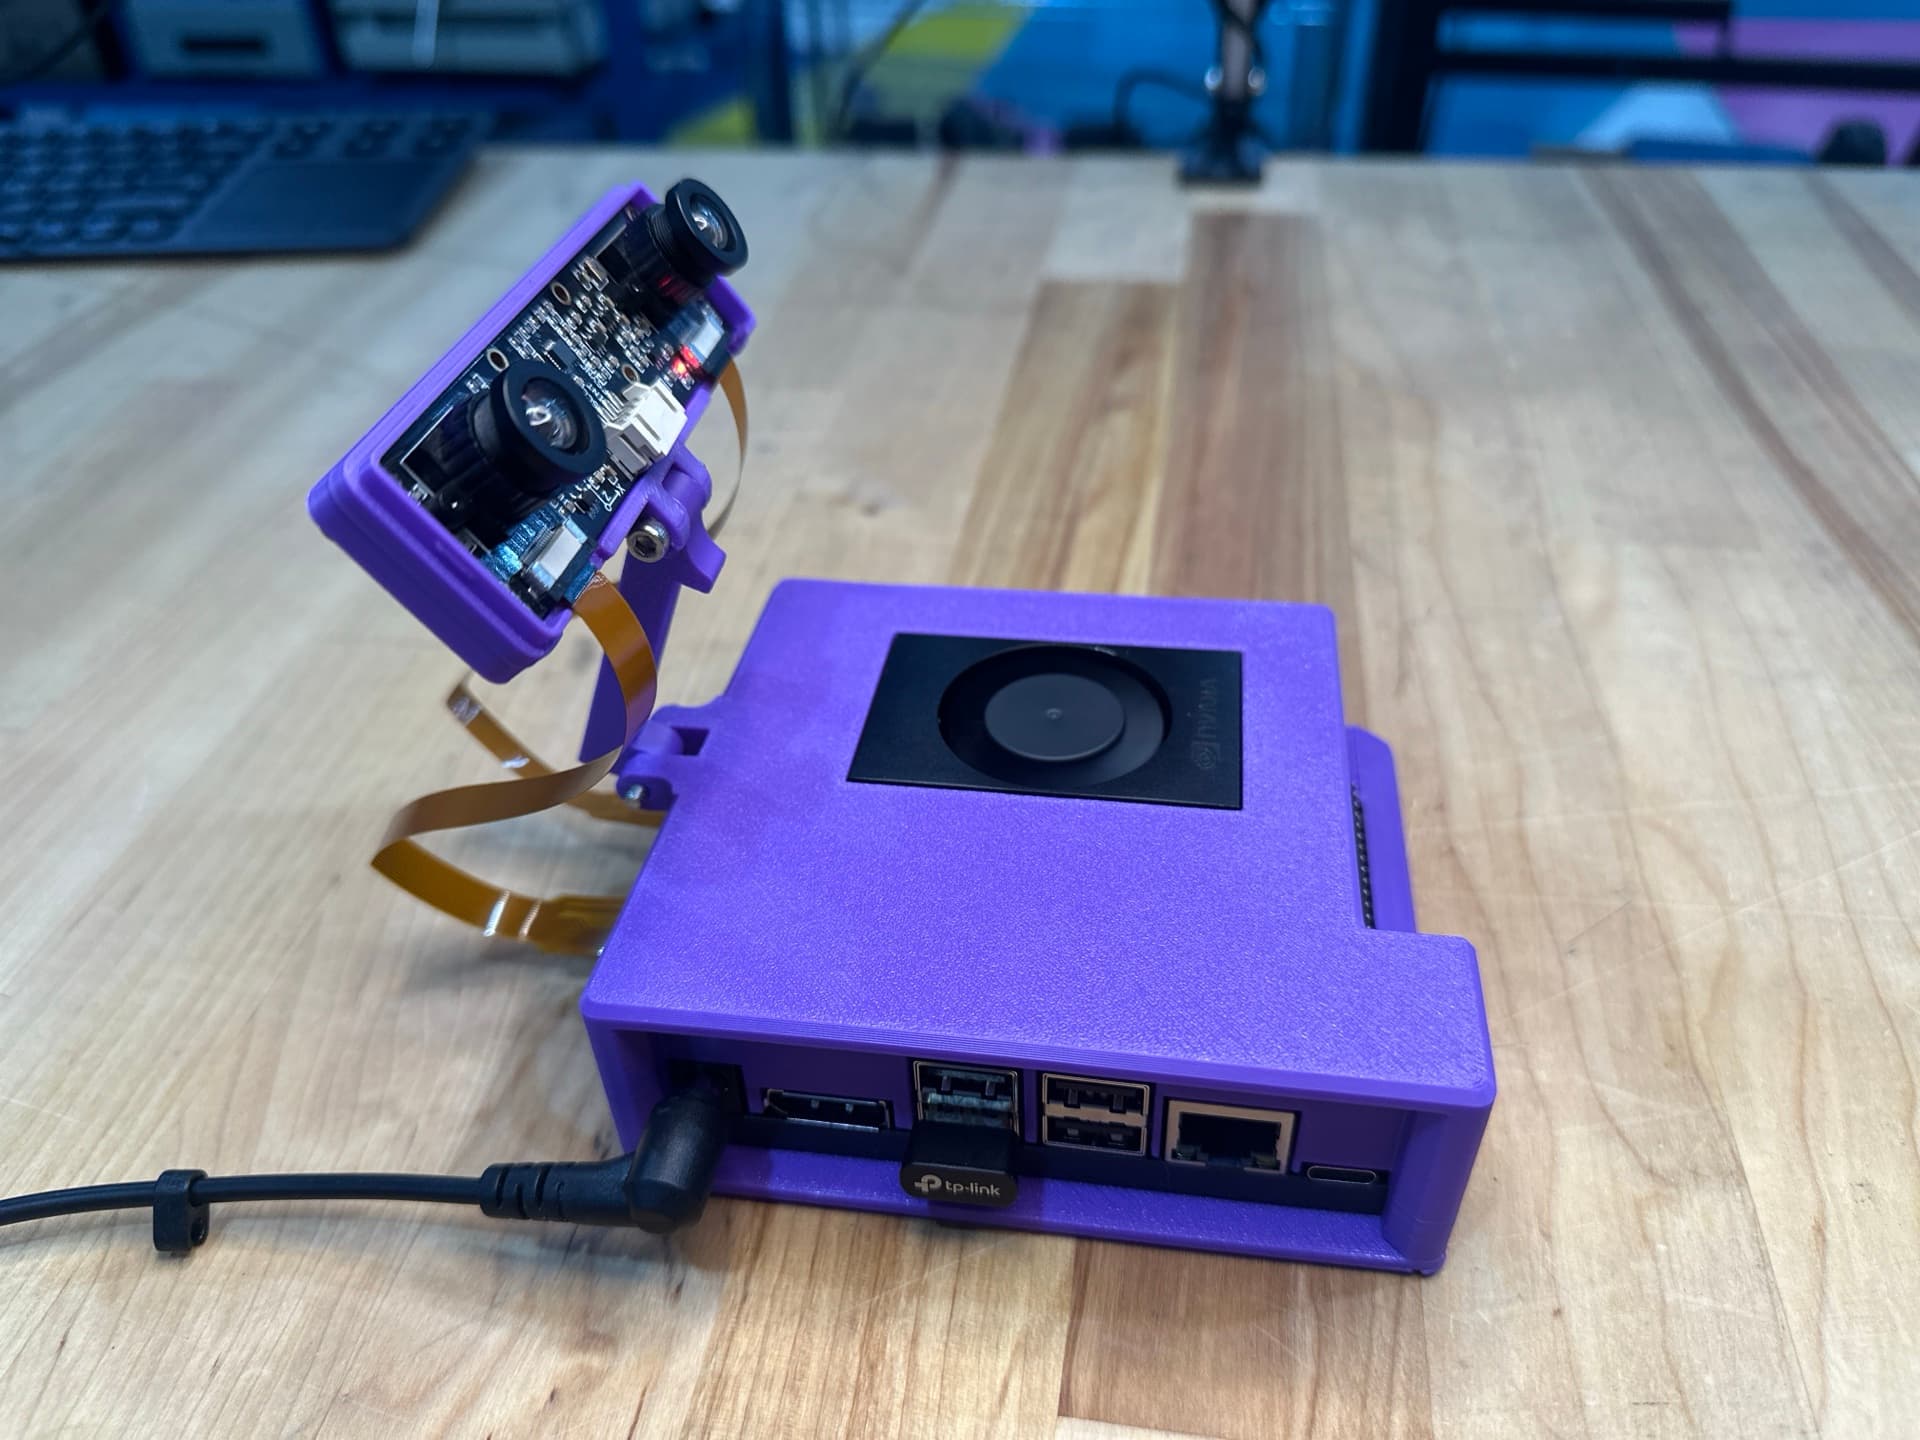
Before we begin, let's make sure you have everything:
- Jetson Orin Nano Developer Kit - The main compute module
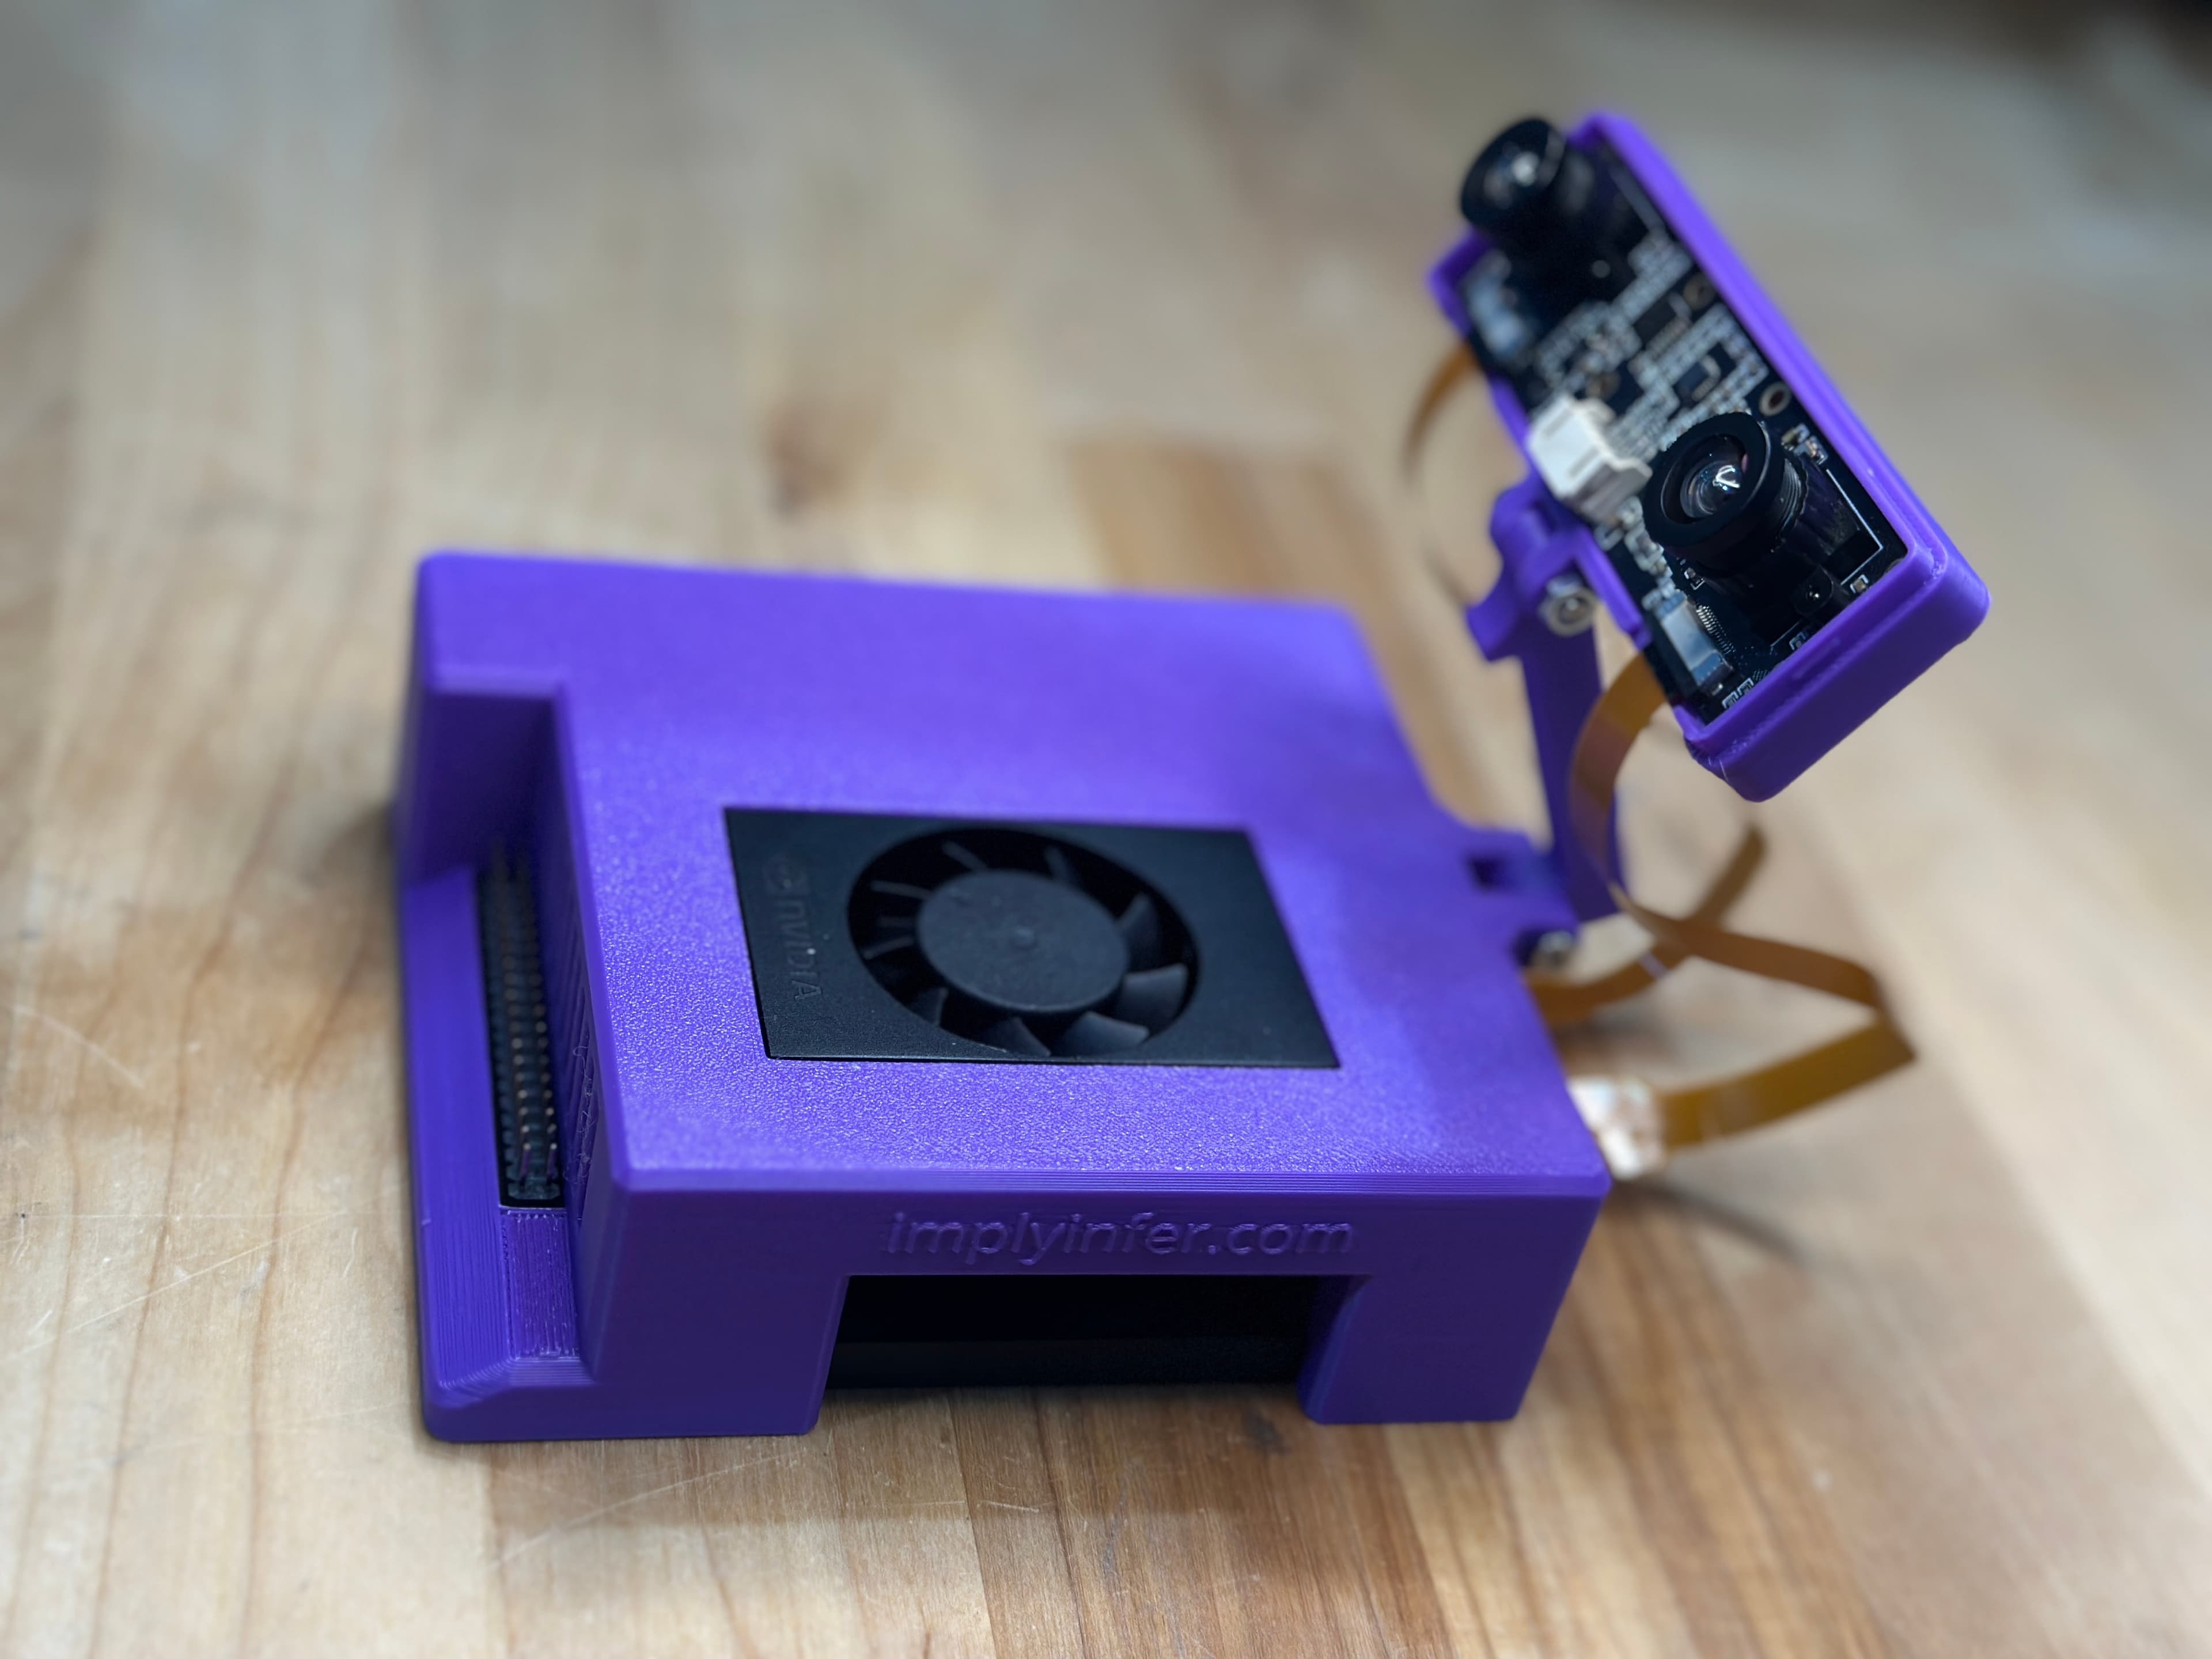
- Field Kit Case - Protective enclosure with mounting options
- Power Supply - 19V power adapter
- NVMe SSD - Pre-flashed with JetPack 6.2 system image
- Dual IMX219 Stereo Cameras - Two camera modules for stereo vision
- TP-Link AC600 USB WiFi Adapter - USB WiFi adapter with pre-installed driver for Access Point mode
- Documentation - Quick start guide and datasheets
Note: The Field Kit comes with a pre-configured system image flashed to the NVMe SSD, so you can get started immediately without manual setup. See the latest release on GitHub for system image details.
WiFi Access Point: If the TP-Link AC600 adapter is installed, it automatically creates a WiFi Access Point named
JetsonFieldKit(password:fieldkit123) on boot. See Network Configuration for details on using AP and Station modes simultaneously.
Prerequisites
Before starting, ensure you have:
- NVMe SSD - Pre-flashed with the Field Kit system image (included)
- Power Supply - 19V power adapter (included)
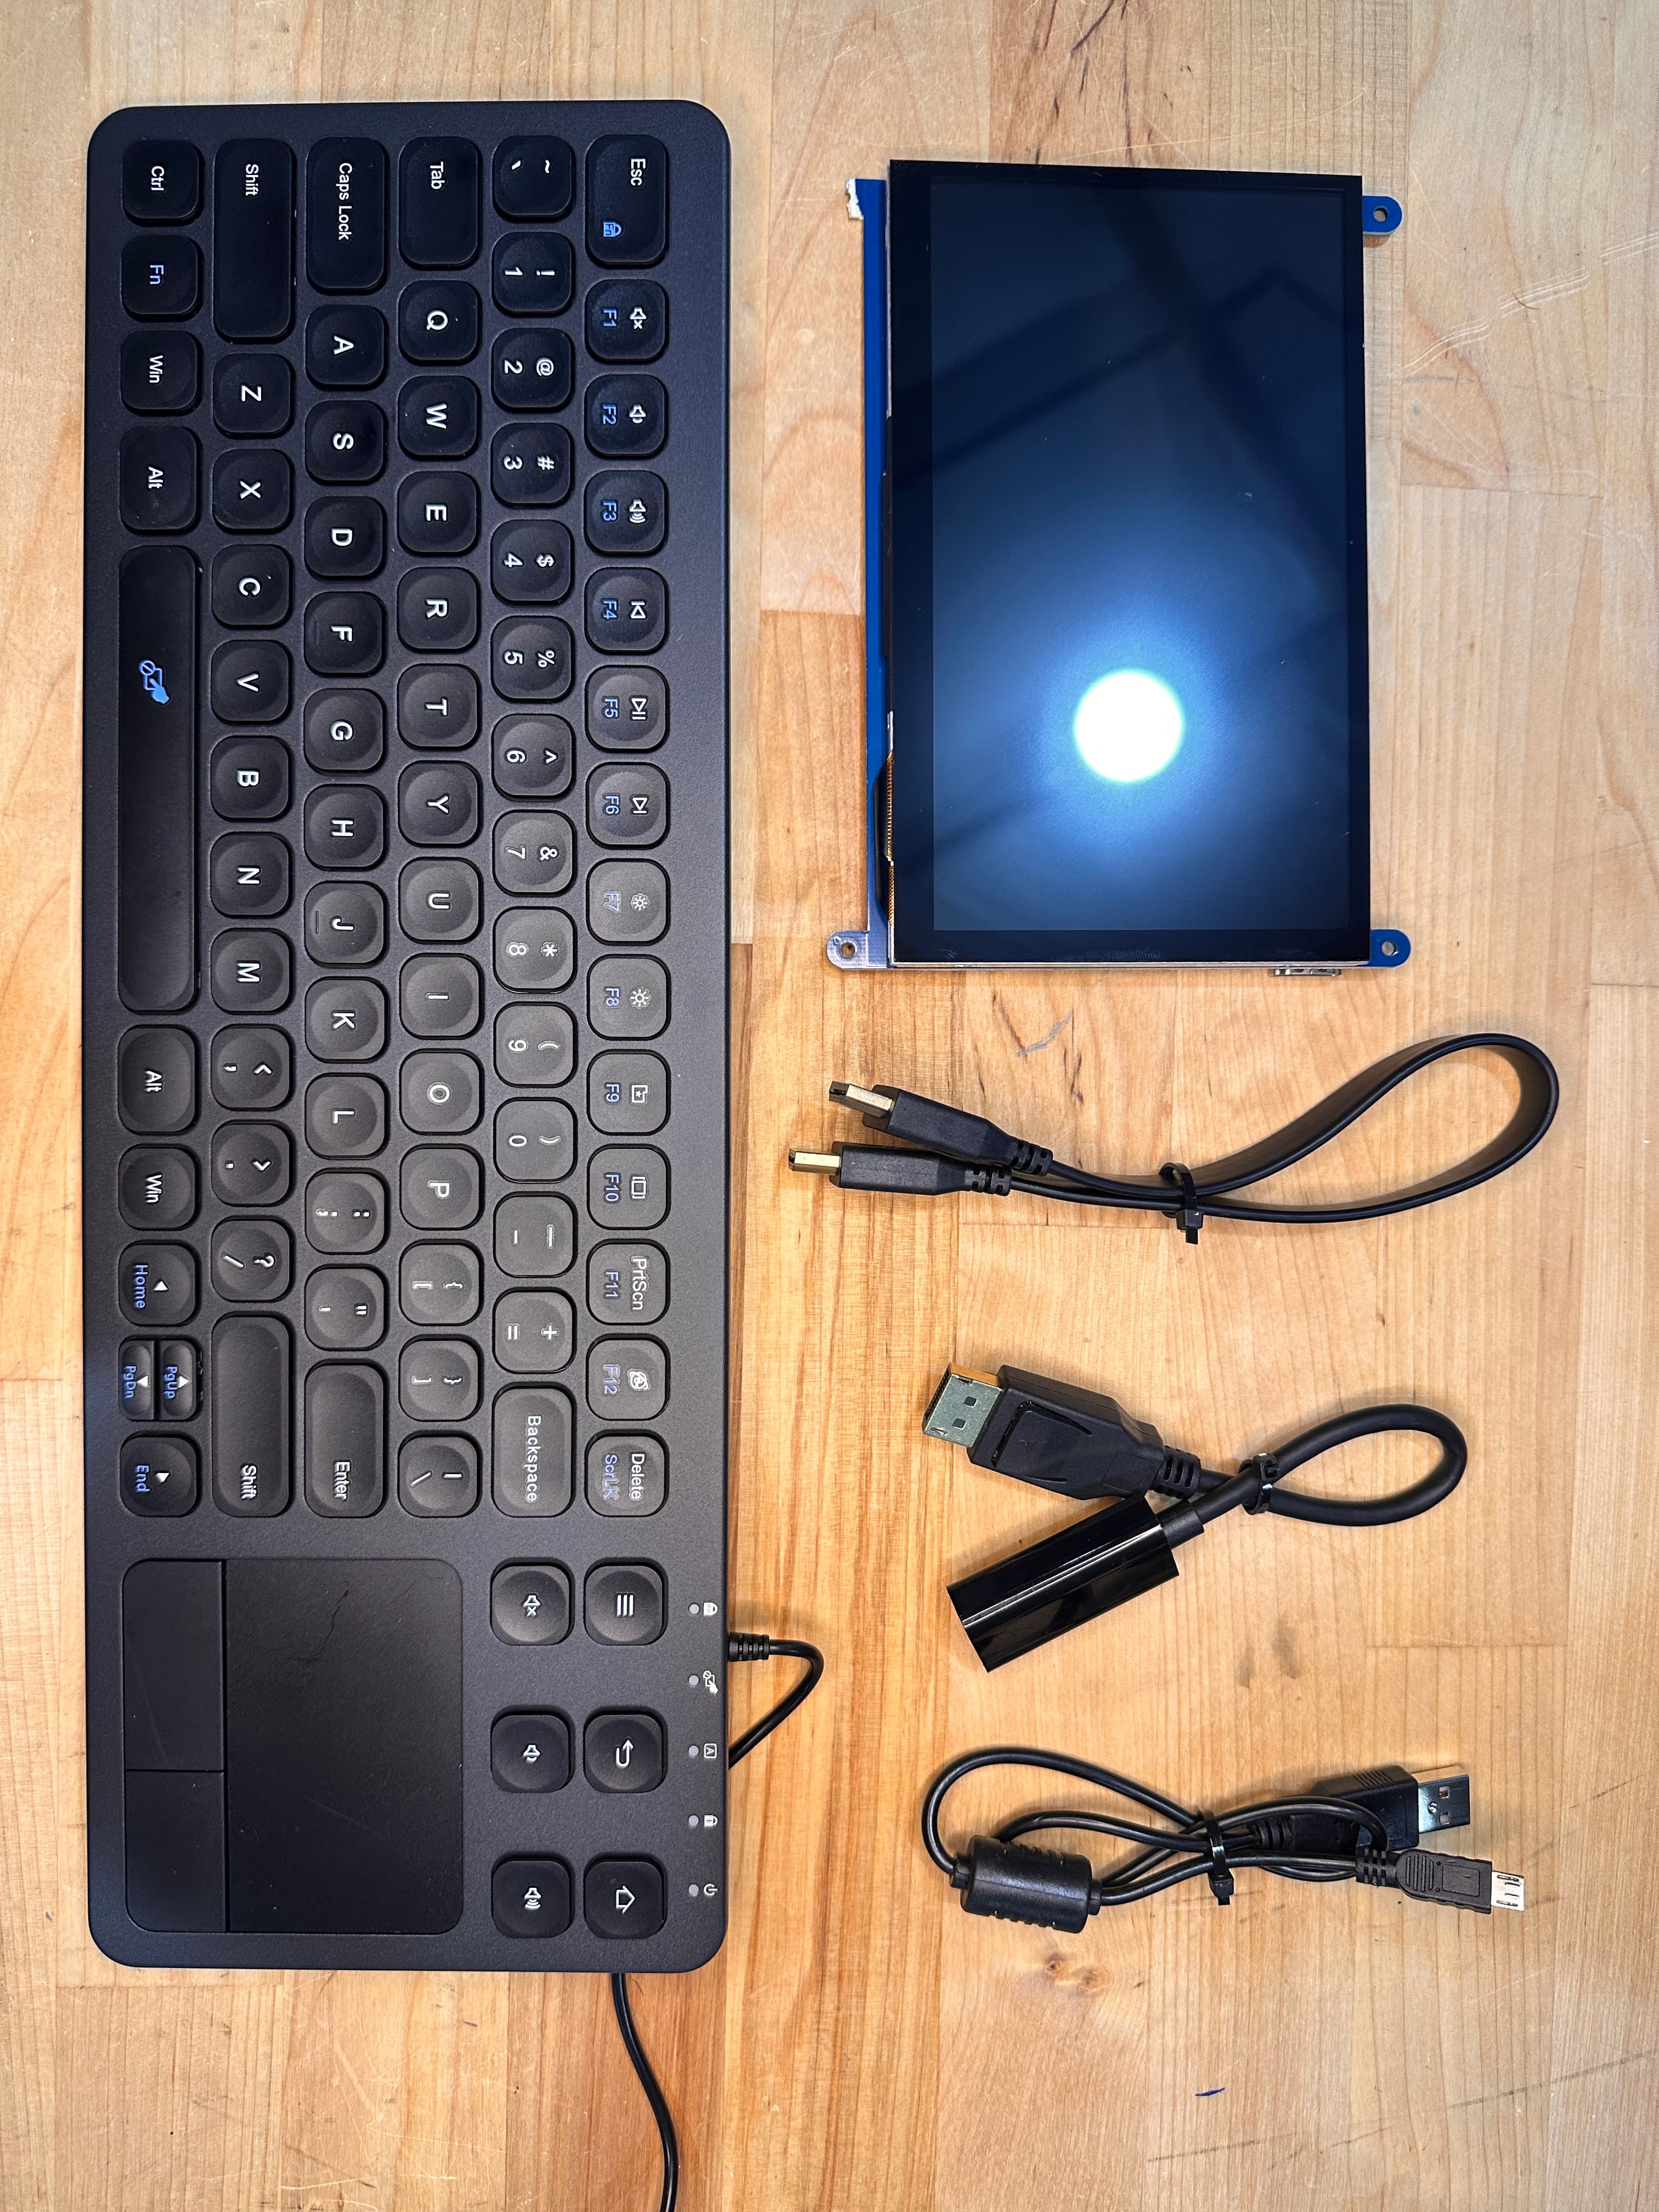
- HDMI cable and monitor (optional, for direct display)
- Keyboard and mouse (USB or wireless, optional for headless setup)
- Computer with SSH client (for remote access, recommended)
Connecting to Your Field Kit
SSH Access
Once your Field Kit is powered on and connected to a network, you can access it remotely via SSH:
On macOS or Linux:
ssh box@box.local
# Password: box
On Windows or if box.local doesn't resolve:
ssh box@192.168.55.1
# Password: box
If 192.168.55.1 doesn't work, try:
ssh box@10.42.0.1
# Password: box
Understanding Network Connections
IP Addresses:
192.168.55.1- The standard IP address for the Jetson Orin Nano on a local peer-to-peer network- Used when connected via USB directly (USB-to-Ethernet bridge)
- Also used when connected via Ethernet in certain network configurations
10.42.0.1- Alternative IP address if192.168.55.1doesn't work- May be used in different network configurations or USB connection modes
Connection Methods:
To SSH into or access the Jetson Orin Nano via a web browser, you must be connected via one of these methods:
- Same WiFi Network - Connect your computer and the Jetson to the same WiFi network
- Access Point Mode - Connect your computer to the Jetson's WiFi Access Point (
JetsonFieldKit) - USB Direct Connection - Connect via USB cable (sets up a peer-to-peer network automatically)
- Ethernet Cable - Connect both devices via Ethernet (may require network configuration)
USB Connection: When you connect the Jetson Orin Nano directly to your computer via USB, it automatically sets up a network bridge. Your computer will see the Jetson at
192.168.55.1(orbox.localif mDNS is working). If that doesn't work, try10.42.0.1. This is the easiest way to get started without any network configuration.
Finding the Jetson's IP Address:
If you're on a network and need to find the Jetson's IP address:
# On the Jetson (if you have direct access)
ip addr show

# Or check router's DHCP client list
# Or use network scanner tools like nmap:
nmap -sn 192.168.1.0/24  # Adjust subnet as needed
Step 1: Initial Hardware Setup
Detailed assembly photos? See the Self-Assembly Guide for step-by-step instructions with photos and a printable poster.
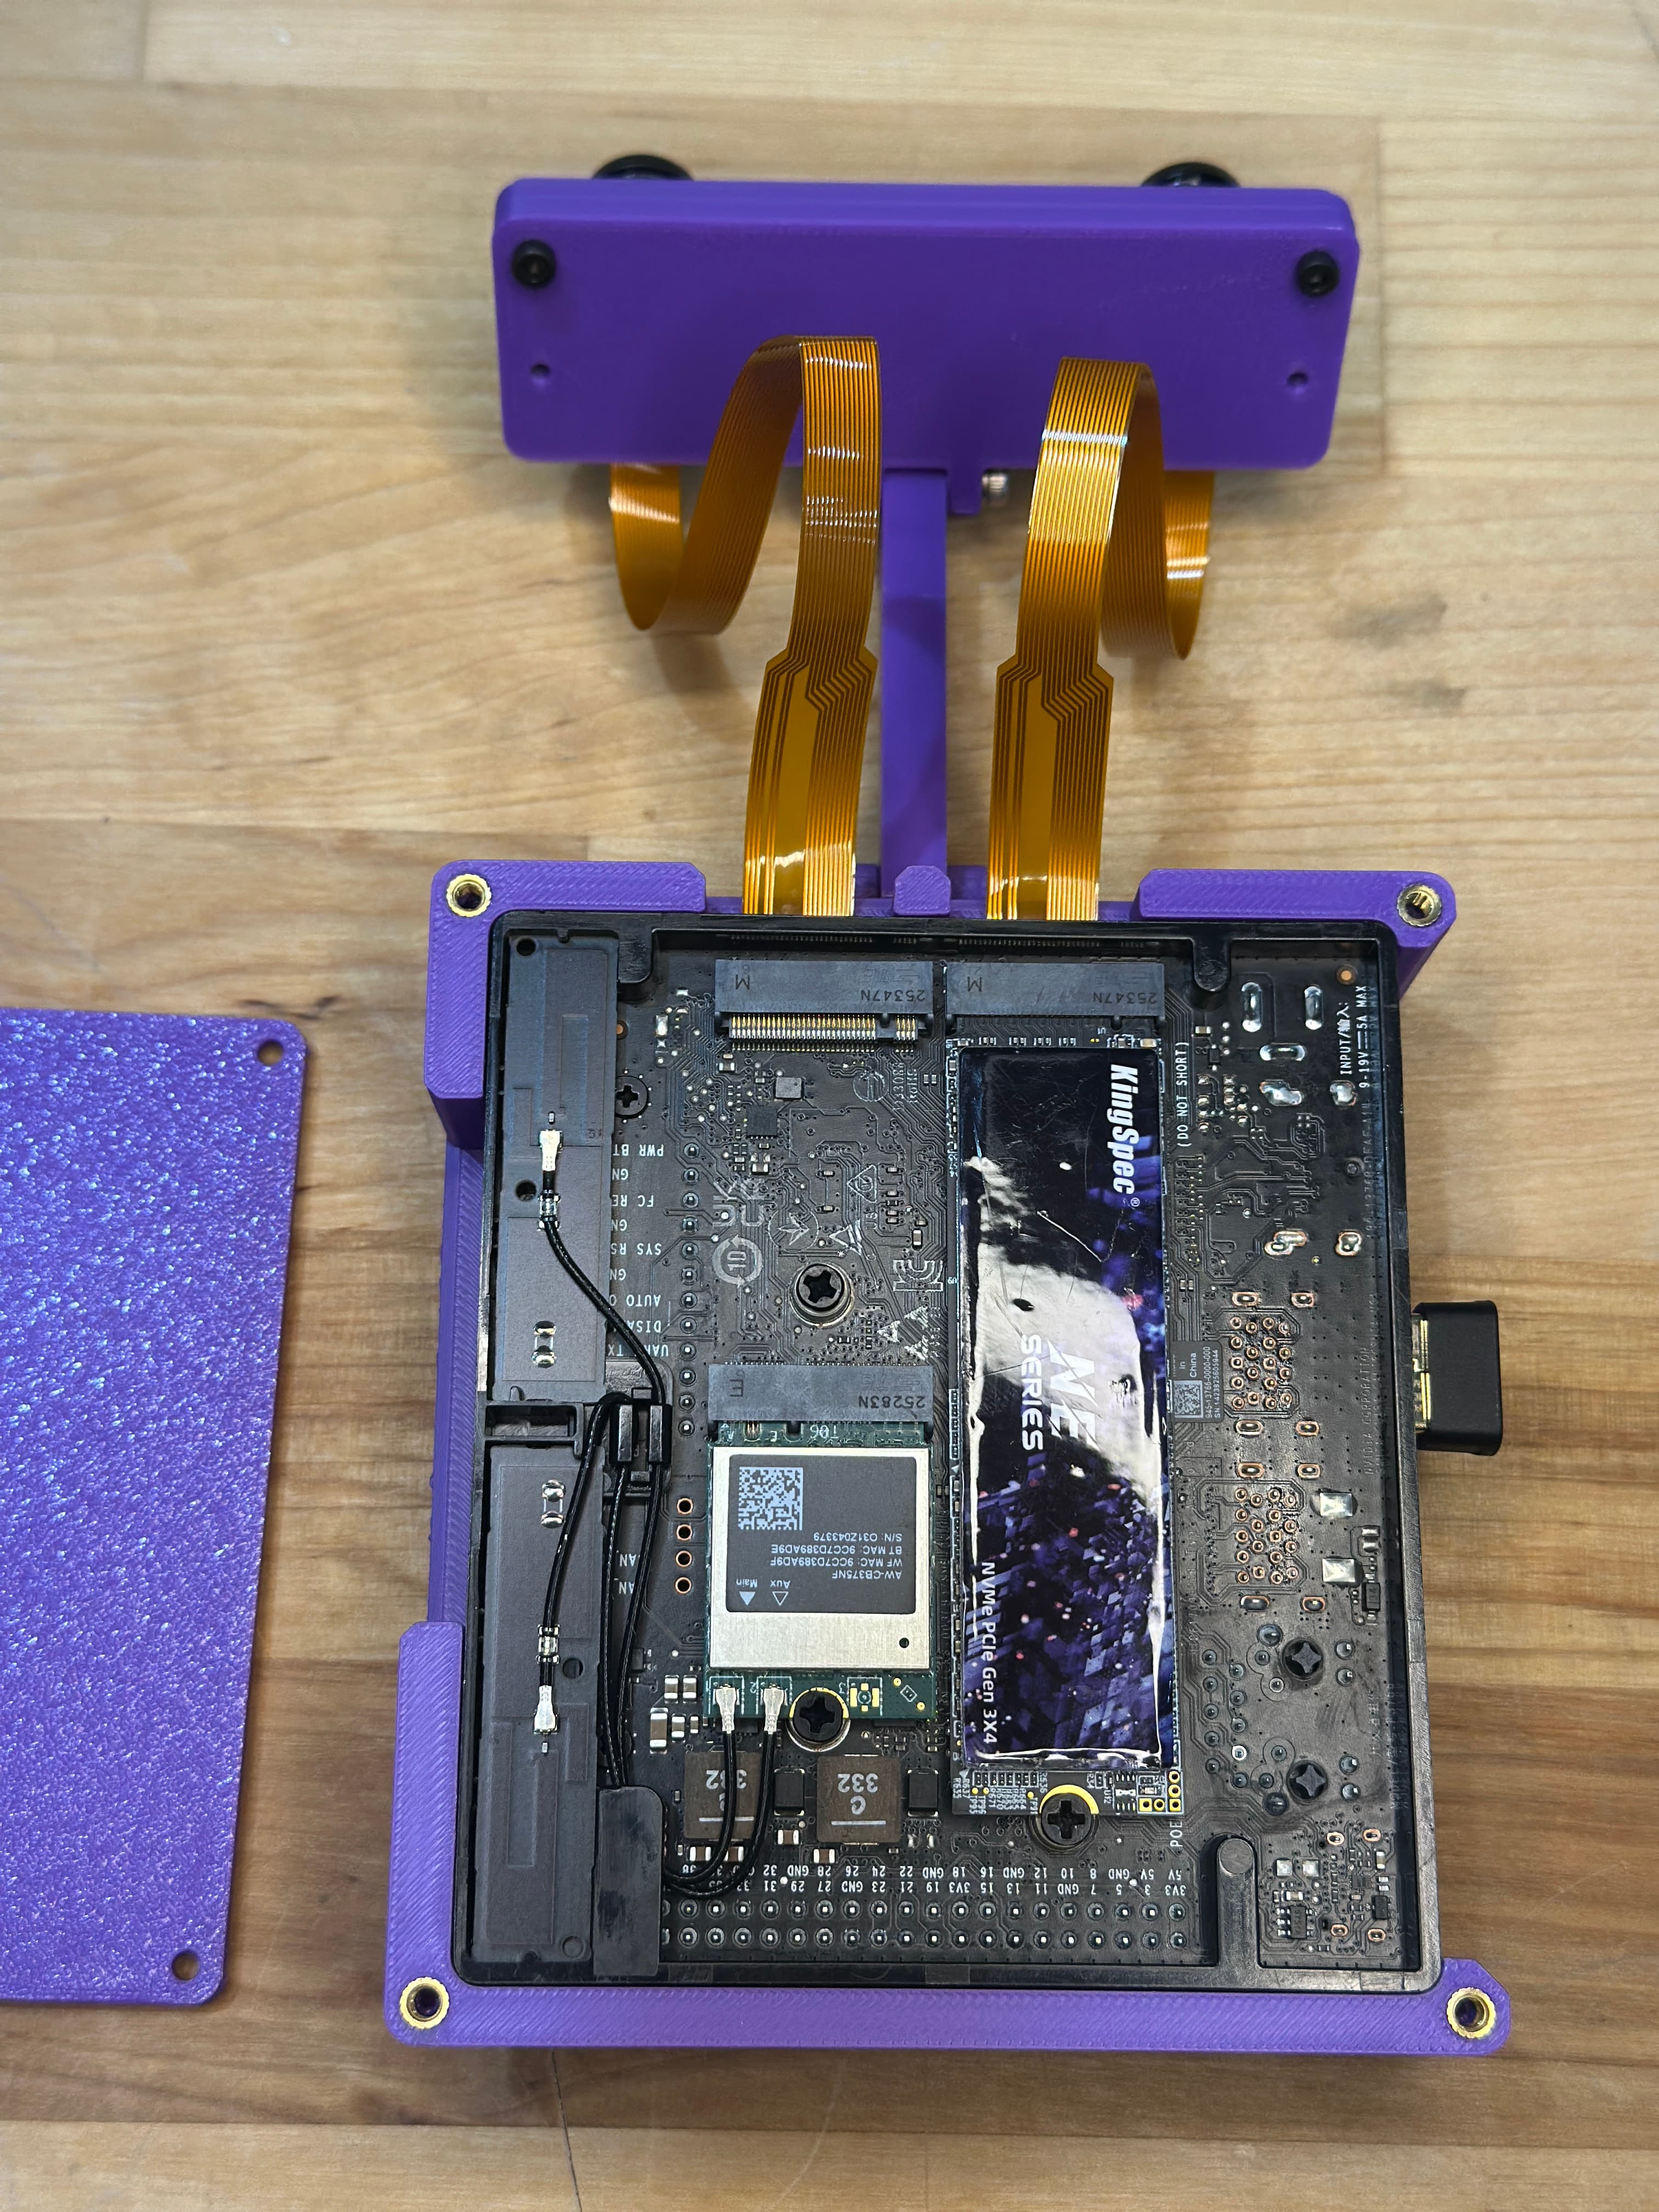
1.1 Install NVMe SSD
The Field Kit includes a pre-flashed NVMe SSD with JetPack 6.2:
- Power off the Jetson module completely
- Locate the M.2 slot on the underside of the Jetson Orin Nano
- Insert the NVMe SSD at a 30-degree angle
- Press down gently until it clicks into place
- Secure with the mounting screw
Note: The NVMe SSD comes pre-flashed with the complete Field Kit system image, including all software and configurations. No manual flashing is required.
1.2 Install Dual IMX219 Cameras
The Field Kit includes dual IMX219 stereo cameras:
- Power off the Jetson module completely
- Locate the camera connectors (CAM0 and CAM1) on the Jetson module
- Connect the camera ribbon cables, ensuring proper orientation (contacts facing inward)
- Connect CAM0 (left camera) to the first connector
- Connect CAM1 (right camera) to the second connector
- Secure the camera modules in the Field Kit case
- Route the cables carefully to avoid pinching
Important: The ribbon cables can be inserted backwards. Ensure the contacts face inward toward the Jetson module.
Step 2: Power On and Initial Boot
2.1 First Power On
- Connect the 19V power adapter to the power jack
- Connect the power adapter to a wall outlet
- Press the power button on the Jetson module
- Wait for the power LED to turn on (green)
Important: Booting may sometimes take 1-2 minutes.
2.2 Boot Sequence Indicators
Watch for these indicators:
- Red light on dual IMX219 camera: Indicates device is on and at least 1 camera is connected
- Solid green LED on Jetson Orin Nano board: Also indicates device is powered on (can be tricky to see with the case)
- Fan spinning: A good indicator that the system is powered on and running
- HDMI Output: Screen should show NVIDIA logo, then boot sequence
2.3 WiFi Hotspot on First Boot
If the TP-Link AC600 USB WiFi adapter is installed, the WiFi Access Point will automatically start during boot:
- Wait for boot to complete (1-2 minutes on boot)
- Look for WiFi network: On any WiFi-enabled device (phone, laptop, tablet), scan for available networks
- Find the network: You should see a network named
JetsonFieldKit - Connect to the hotspot:
- Password:
fieldkit123 - Once connected, the Jetson will be accessible at IP
192.168.4.1(typical AP gateway)
- Password:
Note: The hotspot service starts automatically on boot. If you don't see the
JetsonFieldKitnetwork after a few minutes, check the WiFi AP troubleshooting section.
Connecting via the Hotspot:
Once connected to JetsonFieldKit, you can:
- SSH into the Jetson:
ssh box@192.168.4.1(password:box) - Access web services: Open
http://192.168.4.1in your browser for various services - Use the Access Point while the Jetson connects to another WiFi network (if supported)
2.4 Initial Setup Screen
When the system boots for the first time:
-
Default Credentials:
- Username:
box - Password:
box - Hostname:
box
Security Note: Change the default password immediately after first login:
passwd - Username:
-
Network Configuration - Connect to Wi-Fi or Ethernet
-
System is Pre-configured - Most software is already installed and configured
Note: The Field Kit system image includes pre-installed software: Docker, MediaMTX, Roboflow, Ollama, LiveKit, and more. See the Field Kit repository for details.
Step 3: Verify System Status
3.1 Check System Information
Open a terminal and run:
# Check Jetson model and JetPack version
cat /etc/nv_tegra_release

# Check system resources
free -h
df -h

# Check detailed system stats (RAM, GPU, CPU, etc.)
jtop

# Check GPU status
sudo tegrastats
3.2 Verify Hardware Components

Dual Camera Test:
# List video devices (should show both cameras)
v4l2-ctl --list-devices

# Expected output:
# vi-output, imx219 9-0010 (platform:tegra-capture-vi:2):
#     /dev/video0
# vi-output, imx219 10-0010 (platform:tegra-capture-vi:1):
#     /dev/video1

# Test camera 0
nvgstcapture-1.0 --sensor-id=0 --orientation=2

# Test camera 1
nvgstcapture-1.0 --sensor-id=1 --orientation=2
Audio Test:
# List audio devices
aplay -l

# Test audio output
speaker-test -t wav -c 2
Storage Test:
# Check NVMe SSD
lsblk

# Check filesystem size (should be expanded to full SSD capacity)
df -h
3.3 Check Temperature and Power
# Monitor system temperature
cat /sys/devices/virtual/thermal/thermal_zone*/temp

# Check power mode
sudo nvpmodel -qNote: The Jetson Orin Nano runs in MAXN mode by default. For development, this is fine, but for production, consider power modes based on your use case.
Step 4: Network Configuration
4.1 Connect to Wi-Fi
If you didn't configure Wi-Fi during initial setup:
# List available networks
nmcli device wifi list

# Connect to a network
nmcli device wifi connect "YourNetworkName" password "YourPassword"
4.2 Configure Static IP (Optional)
For production deployments, you may want a static IP:
sudo nmcli connection modify "YourConnection" ipv4.addresses "192.168.1.100/24"
sudo nmcli connection modify "YourConnection" ipv4.gateway "192.168.1.1"
sudo nmcli connection modify "YourConnection" ipv4.dns "8.8.8.8 8.8.4.4"
sudo nmcli connection modify "YourConnection" ipv4.method manual
sudo nmcli connection up "YourConnection"
4.3 Enable SSH (Recommended)
SSH is typically enabled by default, but you can verify and enable it if needed:
# Check SSH status
sudo systemctl status ssh

# Enable SSH (if not already enabled)
sudo systemctl enable ssh
sudo systemctl start ssh

# Verify SSH is running
sudo systemctl status ssh
Connecting via SSH:
Once SSH is enabled, connect using the methods described in the Connecting to Your Field Kit section above:
- macOS/Linux:
ssh box@box.local(password:box) - Windows or if mDNS fails:
ssh box@192.168.55.1(password:box) - If
192.168.55.1doesn't work:ssh box@10.42.0.1(password:box)
Remember: You must be on the same WiFi network, connected to the Access Point, or connected via USB/Ethernet to access the Jetson.
4.4 WiFi Access Point (AP) Mode
The Field Kit includes a TP-Link AC600 USB WiFi adapter with a pre-installed driver. A system service automatically starts the WiFi adapter in Access Point (AP) mode on boot.
Default AP Configuration:
- Network Name (SSID):
JetsonFieldKit - Password:
fieldkit123 - Mode: Access Point (AP)
- Service: Automatically starts on boot
Verify AP Status:
# Check if hotspot service is running
sudo systemctl status hotspot.service

# Check WiFi adapter
lsusb | grep -i tp-link
# Should show: TP-Link AC600 adapter

# View AP network information
nmcli connection show "JetsonFieldKit"
Access the AP:
- From any WiFi-enabled device, look for network
JetsonFieldKit - Connect using password
fieldkit123 - The Jetson will be accessible at IP
192.168.4.1(typical AP gateway)
4.5 Simultaneous AP and Station (STA) Mode
The TP-Link AC600 adapter supports simultaneous AP and STA modes, allowing the Field Kit to:
- Act as an Access Point (other devices connect to it)
- Connect to another WiFi network (internet access)
Configure STA Mode While AP is Active:
-
Check current WiFi interfaces:
# List WiFi devices nmcli device status # Should show: # wlan0 wifi connected JetsonFieldKit (AP mode) # wlan1 wifi available -- (if available for STA) -
If only one interface is available, the adapter can still work in dual mode:
# Connect to a WiFi network while AP is running # The system will manage both modes automatically nmcli device wifi connect "YourNetworkName" password "YourPassword" -
Verify both modes are active:
# Check AP status
nmcli connection show "JetsonFieldKit"

# Check STA connection
nmcli connection show --active

# Test internet connectivity
ping -c 3 8.8.8.8
Troubleshooting AP/STA Mode:
If the adapter doesn't support simultaneous modes or you encounter issues:
-
Check driver status:
# Check if driver is loaded lsmod | grep 8821cu # Check kernel messages dmesg | grep -i 8821cu dmesg | grep -i tp-link -
Restart hotspot service:
sudo systemctl restart hotspot.service sudo systemctl status hotspot.service -
Check NetworkManager configuration:
# List all connections nmcli connection show # Check WiFi device capabilities nmcli device wifi list -
Manual AP configuration (if needed):
# Stop automatic hotspot
sudo systemctl stop hotspot.service

# Create manual AP connection
nmcli connection add type wifi ifname wlan0 con-name "JetsonFieldKit" \
  autoconnect yes ssid "JetsonFieldKit"
nmcli connection modify "JetsonFieldKit" wifi-sec.key-mgmt wpa-psk
nmcli connection modify "JetsonFieldKit" wifi-sec.psk "fieldkit123"
nmcli connection modify "JetsonFieldKit" ipv4.method shared
nmcli connection up "JetsonFieldKit"
Best Practices:
- The AP mode is useful for field deployments where no existing WiFi is available
- STA mode provides internet access when connected to an existing network
- Both modes can work simultaneously if the adapter supports it
- Use Ethernet for more stable connections when available
Step 5: Install Essential Software
5.1 Update System Packages
sudo apt update
sudo apt upgrade -y
5.2 Verify Pre-installed Software
The Field Kit comes with most software pre-installed. Verify installation:
# Check Docker (should be installed)
docker --version

# Check NVIDIA Container Runtime
docker info | grep -i runtime

# Check CUDA version (should be 12.6)
nvcc --version

# Check Python packages
pip3 list | grep -E "(torch|opencv|numpy)"

# Check system services
systemctl status mediamtx.service  # RTSP streaming
systemctl status docker.service
5.3 Install Field Kit Application Layer
Clone and set up the Field Kit application repository:
# Clone the repository
git clone https://github.com/implyinfer/jetson-orin-nano-field-kit.git
cd jetson-orin-nano-field-kit

# Install pnpm if needed
npm install -g pnpm@9.0.0

# Install project dependencies
pnpm install

# Set up system services
cd system
bash provision.sh
This sets up:
- MediaMTX RTSP streaming server
- Kiwix offline knowledge base
- Roboflow inference server
- Open WebUI for Ollama
- Other system services
Step 6: Verify Everything Works
6.1 Run System Diagnostics
Create a test script to verify all components:
#!/bin/bash
echo "=== Jetson Orin Nano Field Kit Diagnostics ==="
echo ""
echo "System Info:"
cat /etc/nv_tegra_release
echo ""
echo "CPU Info:"
lscpu | grep "Model name"
echo ""
echo "Memory:"
free -h
echo ""
echo "Storage:"
df -h
echo ""
echo "GPU Status:"
sudo tegrastats --interval 1000 --logfile /tmp/tegrastats.txt &
sleep 2
killall tegrastats
cat /tmp/tegrastats.txt
echo ""
echo "Camera Devices:"
v4l2-ctl --list-devices
echo ""
echo "Audio Devices:"
aplay -l
echo ""
echo "Network:"
ip addr show
echo ""
echo "Temperature:"
cat /sys/devices/virtual/thermal/thermal_zone*/temp | awk '{print $1/1000 "°C"}'
Save this as diagnostics.sh, make it executable, and run it:
chmod +x diagnostics.sh
./diagnostics.sh
6.2 Test Dual Camera Capture
# Capture from camera 0 (left)
nvgstcapture-1.0 --sensor-id=0 --orientation=2 --image-res=2 --file-name=/tmp/test_cam0.jpg

# Capture from camera 1 (right)
nvgstcapture-1.0 --sensor-id=1 --orientation=2 --image-res=2 --file-name=/tmp/test_cam1.jpg

# View the images
xdg-open /tmp/test_cam0.jpg
xdg-open /tmp/test_cam1.jpg

# Test RTSP streaming (if MediaMTX is running)
# Camera 0: rtsp://localhost:8554/cam0
# Camera 1: rtsp://localhost:8554/cam1
6.3 Test GPU Acceleration
# Run a simple CUDA test
python3 << EOF
import torch
print(f"CUDA Available: {torch.cuda.is_available()}")
print(f"CUDA Device: {torch.cuda.get_device_name(0) if torch.cuda.is_available() else 'N/A'}")
EOF
Step 7: Configure for Your Use Case
7.1 Set Power Mode
Choose the appropriate power mode:
# List available power modes
sudo nvpmodel -q

# Set to MAXN (maximum performance)
sudo nvpmodel -m 3

# Set to 25W mode (balanced)
sudo nvpmodel -m 2

# Set to 15W mode (power saving)
sudo nvpmodel -m 1

# Set to 7W mode (power saving)
sudo nvpmodel -m 0
7.2 Configure Fan Control (if applicable)
If your Field Kit includes active cooling:
# Check fan status
cat /sys/devices/pwm-fan/target_pwm

# Set fan speed (0-255)
echo 128 | sudo tee /sys/devices/pwm-fan/target_pwm
7.3 Enable Auto-Start Services
For production deployments, configure services to start automatically:
# Example: Enable your application service
sudo systemctl enable your-app.service
sudo systemctl start your-app.service
Troubleshooting First Boot Issues
Issue: System Won't Power On
Solutions:
- Verify power adapter is properly connected (19V required)
- Check power LED status
- Try a different power outlet
- Ensure power button is pressed firmly
Issue: No Display Output
Solutions:
- Verify HDMI cable connection
- Try a different HDMI cable
- Check display input source
- Connect via SSH if network is configured
Issue: Boot Hangs or Freezes
Solutions:
- Wait longer (first boot can take 5+ minutes)
- Check microSD card integrity
- Verify power supply is adequate
- Check for overheating (ensure proper ventilation)
Issue: Camera Not Detected
Solutions:
- Verify both camera ribbon cables are connected (CAM0 and CAM1)
- Check cable orientation (contacts must face inward toward Jetson module)
- Ensure camera modules are properly seated
- Run
v4l2-ctl --list-devicesto check detection - Verify cameras are configured in Jetson I/O:
sudo /opt/nvidia/jetson-io/jetson-io.py - Check kernel messages:
dmesg | grep -i camera
Issue: Network Not Working
Solutions:
- Verify Ethernet cable connection
- Check Wi-Fi credentials
- Run
nmcli device statusto check connection status - Restart network service:
sudo systemctl restart NetworkManager
Issue: Unable to Load box.local or 10.42.0.1 in Browser
If you cannot access the web interface or box.local, follow these device-specific instructions:
iOS (iPhone/iPad)
When first connecting:
- Connect to
JetsonFieldKitWiFi - Open Safari and go to
http://10.42.0.1 - A popup will appear: "Safari" Would Like to Find and Connect to Devices on Your Local Network
- Tap Allow
If you accidentally denied or don't see the popup:
- Go to Settings → Privacy & Security → Local Network
- Find Safari and toggle it ON
- If Safari isn't listed, try visiting the URL again - the prompt should reappear
Alternative - Reset the prompt:
- Go to Settings → Safari → Clear History and Website Data
- Revisit
http://10.42.0.1- the permission prompt should appear again
Android
Android typically doesn't block local network access, but if using Chrome:
- Ensure you're connected to
JetsonFieldKitWiFi - Navigate to
http://10.42.0.1 - If prompted about an insecure connection, tap Advanced → Proceed
macOS
- When Safari prompts "allow access to devices on local network", click Allow
- Or go to System Settings → Privacy & Security → Local Network and enable for Safari/Chrome
Windows
Windows browsers don't typically block local network access. Just ensure:
- Connected to
JetsonFieldKitWiFi - If Windows Firewall prompts, click Allow
Issue: WiFi AP Not Starting
Symptoms:
- Can't find "JetsonFieldKit" network
- Hotspot service not running
Solutions:
# Check hotspot service status
sudo systemctl status hotspot.service

# Check if TP-Link adapter is detected
lsusb | grep -i tp-link

# Check driver status
lsmod | grep 8821cu

# Restart hotspot service
sudo systemctl restart hotspot.service

# Check service logs
sudo journalctl -u hotspot.service -n 50
Issue: Can't Connect to AP and WiFi Network Simultaneously
Solutions:
# Check WiFi device capabilities
nmcli device status

# Verify both connections exist
nmcli connection show

# If adapter doesn't support dual mode, you may need to:
# 1. Use AP mode only (no internet)
# 2. Use STA mode only (connect to existing WiFi)
# 3. Use Ethernet for internet + AP for local access

# Check if both modes are active
ip addr show
# Should show IP addresses for both AP and STA if working
Next Steps
Now that your Field Kit is set up and verified, you're ready to explore:
- Computer Vision - Learn to work with cameras and vision models
- Voice Assistant - Build voice-enabled applications
- Working with LLMs - Deploy and run large language models
- Troubleshooting - Common issues and solutions
- Good Guidance - Best practices and optimization tips
Additional Resources
- Field Kit Repository - Application layer and system services
- Field Kit Setup Notes - Detailed setup instructions
- Jetson Orin Nano Developer Kit Documentation
- JetPack 6.2 Documentation
- NVIDIA Developer Forums
Support
If you encounter issues not covered in this guide:
- Check the Troubleshooting section
- Review NVIDIA's official documentation
- Search the NVIDIA Developer Forums
- Contact support with detailed error messages and system logs
Congratulations! Your Jetson Orin Nano Field Kit is now set up and ready for development. Happy coding!