Local Computer Vision with Roboflow
Complete guide to local computer vision on the Jetson Orin Nano Field Kit using Roboflow Inference Server
Introduction
The Jetson Orin Nano Field Kit is optimized for computer vision workloads. With its powerful GPU and integrated camera support, you can build sophisticated vision applications ranging from object detection to real-time video processing.
The Field Kit includes a pre-configured Roboflow Inference Server running locally - providing GPU-accelerated object detection and segmentation without requiring internet connectivity after initial setup. This makes it perfect for edge deployments where you need powerful computer vision capabilities offline.
Camera Setup
Dual IMX219 Stereo Cameras
The Field Kit includes dual IMX219 stereo cameras configured for stereo vision:
- CAM0 (Left camera) -
/dev/video0 - CAM1 (Right camera) -
/dev/video1 - Both cameras stream at 1280x720 @ 30fps via MediaMTX RTSP server
Additional Camera Support
The system also supports:
- USB Webcams - Standard USB 2.0/3.0 cameras
- Other CSI Cameras - MIPI CSI-2 compatible cameras
Camera Configuration
List available cameras:
v4l2-ctl --list-devicesExpected output for dual IMX219 setup:
vi-output, imx219 9-0010 (platform:tegra-capture-vi:2):
    /dev/video0

vi-output, imx219 10-0010 (platform:tegra-capture-vi:1):
    /dev/video1
Check camera capabilities:
# Check camera 0
v4l2-ctl --device=/dev/video0 --list-formats-ext

# Check camera 1
v4l2-ctl --device=/dev/video1 --list-formats-ext
Capture test images:
# Capture from camera 0 (left)
nvgstcapture-1.0 --sensor-id=0 --orientation=2 --image-res=2 --file-name=/tmp/test_cam0.jpg

# Capture from camera 1 (right)
nvgstcapture-1.0 --sensor-id=1 --orientation=2 --image-res=2 --file-name=/tmp/test_cam1.jpg
RTSP Streaming with MediaMTX
The Field Kit includes MediaMTX for RTSP/WebRTC streaming:
Available Streams:
- Camera 0:
rtsp://<JETSON_IP>:8554/cam0(RTSP),http://<JETSON_IP>:8888/cam0(HLS),http://<JETSON_IP>:8889/cam0(WebRTC) - Camera 1:
rtsp://<JETSON_IP>:8554/cam1(RTSP),http://<JETSON_IP>:8888/cam1(HLS),http://<JETSON_IP>:8889/cam1(WebRTC)
Start MediaMTX service:
sudo systemctl start mediamtx.service
sudo systemctl enable mediamtx.service  # Enable on boot
View streams:
# Using VLC
vlc rtsp://localhost:8554/cam0

# Using FFplay
ffplay -rtsp_transport tcp rtsp://localhost:8554/cam0

# In web browser
# Open: http://<JETSON_IP>:8888/cam0
OpenCV Setup
Pre-installed OpenCV
The Field Kit comes with OpenCV 4.12.0 built with CUDA support pre-installed. This provides GPU-accelerated operations.
Verify installation:
python3 -c "import cv2; print(cv2.__version__)"
# Should show: 4.12.0

# Check CUDA support
python3 -c "import cv2; print(cv2.cuda.getCudaEnabledDeviceCount())"
# Should show: 1 (CUDA device available)Note: The pre-installed OpenCV includes:
- CUDA acceleration (
OPENCV_DNN_CUDA=ON) - GStreamer support
- Python 3 bindings
- All contrib modules
Basic Camera Capture
import cv2

# Open camera
cap = cv2.VideoCapture(0)

if not cap.isOpened():
    print("Error: Could not open camera")
    exit()

# Set resolution
cap.set(cv2.CAP_PROP_FRAME_WIDTH, 1920)
cap.set(cv2.CAP_PROP_FRAME_HEIGHT, 1080)

# Capture frame
ret, frame = cap.read()

if ret:
    cv2.imwrite('/tmp/capture.jpg', frame)
    print("Image saved to /tmp/capture.jpg")

cap.release()
Vision Models
TensorRT Optimization
For best performance, use TensorRT to optimize your models:
import tensorrt as trt
import pycuda.driver as cuda
import pycuda.autoinit
import numpy as np

# Load and optimize model with TensorRT
# (Example structure - actual implementation depends on your model)
Roboflow Local Inference
Roboflow is the primary computer vision platform for the Field Kit. The Field Kit includes a pre-configured Roboflow Inference Server running locally on your Jetson, providing GPU-accelerated object detection and segmentation without requiring internet connectivity after initial setup.
Roboflow provides state-of-the-art models including YOLOv11, RF-DETR, and segmentation models, all optimized for edge deployment with TensorRT acceleration. The inference server runs as a Docker container and exposes a simple REST API for easy integration into your applications.
Overview
The Roboflow Inference Server runs as a Docker container and provides:
- GPU-accelerated inference using TensorRT, CUDA, and CPU execution providers
- Local model caching - models are downloaded once and cached for offline use
- REST API for easy integration with your applications
- Multiple model architectures - YOLOv8, YOLOv11, RF-DETR, and segmentation models
- Real-time performance - optimized for edge deployment
Jetpack 6.2 Support: Roboflow has created a dedicated Docker image specifically optimized for Jetson Orin Nano with Jetpack 6.2. This image is fully supported and runs exceptionally well on the Field Kit's pre-configured system image. For details on how Roboflow built this specialized image, see their Jetpack 6.2 support announcement.
Pre-installed Models
The Field Kit comes with 8 pre-installed models ready to use immediately:
Object Detection Models (7 models):
| Model | Description | Speed | Accuracy | Use Case |
|---|---|---|---|---|
yolov11n-640 | YOLOv11 Nano 640x640 | ⚡⚡⚡ Fastest | Good | Real-time detection, low latency |
yolov11s-640 | YOLOv11 Small 640x640 | ⚡⚡ Fast | Better | Balanced speed/accuracy |
yolov8n-640 | YOLOv8 Nano 640x640 | ⚡⚡⚡ Fastest | Good | Legacy YOLOv8 support |
yolov8s-640 | YOLOv8 Small 640x640 | ⚡⚡ Fast | Better | Balanced performance |
rfdetr-nano | RF-DETR Nano | ⚡⚡⚡ Fast | Excellent | High accuracy, fast inference |
rfdetr-small | RF-DETR Small | ⚡⚡ Fast | ⭐ Best | Highest accuracy |
rfdetr-medium | RF-DETR Medium | ⚡ Moderate | ⭐⭐⭐ Best | Maximum accuracy |
Segmentation Models (1 model):
| Model | Description | Speed | Use Case |
|---|---|---|---|
yolov11n-seg-640 | YOLOv11 Nano Segmentation | ⚡⚡ Fast | Instance segmentation, pixel-level masks |
Note: These 8 models are pre-downloaded and cached locally. Additional models (YOLOv10, YOLOv8 Medium, more segmentation variants) can be downloaded using the
download_models.pyscript. See Downloading Additional Models below.
Starting the Roboflow Inference Server
The Roboflow Inference Server runs as a Docker container. It's configured to start automatically, but you can manage it manually:
Check Status:
# Check if service is running
sudo systemctl status roboflow.service

# Check Docker container
docker ps | grep roboflow
Start the Server:
# Start via systemd service
sudo systemctl start roboflow.service

# Or start manually via Docker
sudo docker run -d \
  --name rf-inference \
  --runtime nvidia \
  --read-only \
  --tmpfs /tmp:rw,noexec,nosuid,size=256m \
  -p 9001:9001 \
  -v /home/box/roboflow-cache:/cache:rw \
  --security-opt="no-new-privileges" \
  --cap-drop="ALL" \
  --cap-add="NET_BIND_SERVICE" \
  -e MODEL_CACHE_DIR="/cache" \
  -e MPLCONFIGDIR="/tmp/matplotlib" \
  -e "ONNXRUNTIME_EXECUTION_PROVIDERS=[TensorrtExecutionProvider,CUDAExecutionProvider,CPUExecutionProvider]" \
  -e METRICS_ENABLED=false \
  -e ENABLE_BUILDER=True \
  roboflow/roboflow-inference-server-jetson-6.2.0:latest
Verify Server is Running:
# Check if server responds
curl http://localhost:9001/health

# List available models (after they're loaded)
curl http://localhost:9001/info
Using Roboflow Models
Python API
Basic Inference:
from inference_sdk import InferenceHTTPClient

# Initialize client (no API key needed for local server)
client = InferenceHTTPClient(api_url="http://localhost:9001")

# Run inference on an image file
result = client.infer(
    inference_input="/path/to/image.jpg",
    model_id="yolov11n-640"
)

# Process results
for prediction in result.get("predictions", []):
    print(f"Class: {prediction['class']}")
    print(f"Confidence: {prediction['confidence']:.2f}")
    print(f"Bounding box: {prediction['x']}, {prediction['y']}, {prediction['width']}, {prediction['height']}")
Inference on RTSP Stream:
from inference_sdk import InferenceHTTPClient

client = InferenceHTTPClient(api_url="http://localhost:9001")

# Run inference on RTSP camera stream
result = client.infer(
    inference_input="rtsp://localhost:8554/cam0",
    model_id="rfdetr-small"
)

print(result)
With Confidence Threshold:
result = client.infer(
    inference_input="/path/to/image.jpg",
    model_id="yolov11n-640",
    confidence=0.5  # Only return detections with >50% confidence
)
REST API
Using curl:
# Inference on image file
curl -X POST http://localhost:9001/infer/yolov11n-640 \
  -F "image=@/path/to/image.jpg"

# Inference on image URL
curl -X POST http://localhost:9001/infer/yolov11n-640 \
  -H "Content-Type: application/json" \
  -d '{"image": {"type": "url", "value": "https://example.com/image.jpg"}}'

# Inference on RTSP stream
curl -X POST http://localhost:9001/infer/rfdetr-small \
  -H "Content-Type: application/json" \
  -d '{"image": {"type": "rtsp", "value": "rtsp://localhost:8554/cam0"}}'
Response Format:
{
  "predictions": [
    {
      "class": "person",
      "confidence": 0.95,
      "x": 100,
      "y": 150,
      "width": 200,
      "height": 300
    }
  ],
  "time": 0.023
}
Real-time Web Streaming
The Field Kit includes a web streaming application that displays real-time inference results in your browser:
Start Web Stream:
cd jetson-orin-nano-field-kit/apps/vision/roboflow
source venv/bin/activate
# Use default settings (yolov11n-640, cam0, port 5000)
python run_roboflow_web_stream.py
# Customize model and settings
python run_roboflow_web_stream.py \
--model rfdetr-small \
--rtsp-url rtsp://127.0.0.1:8554/cam0 \
--confidence 0.7 \
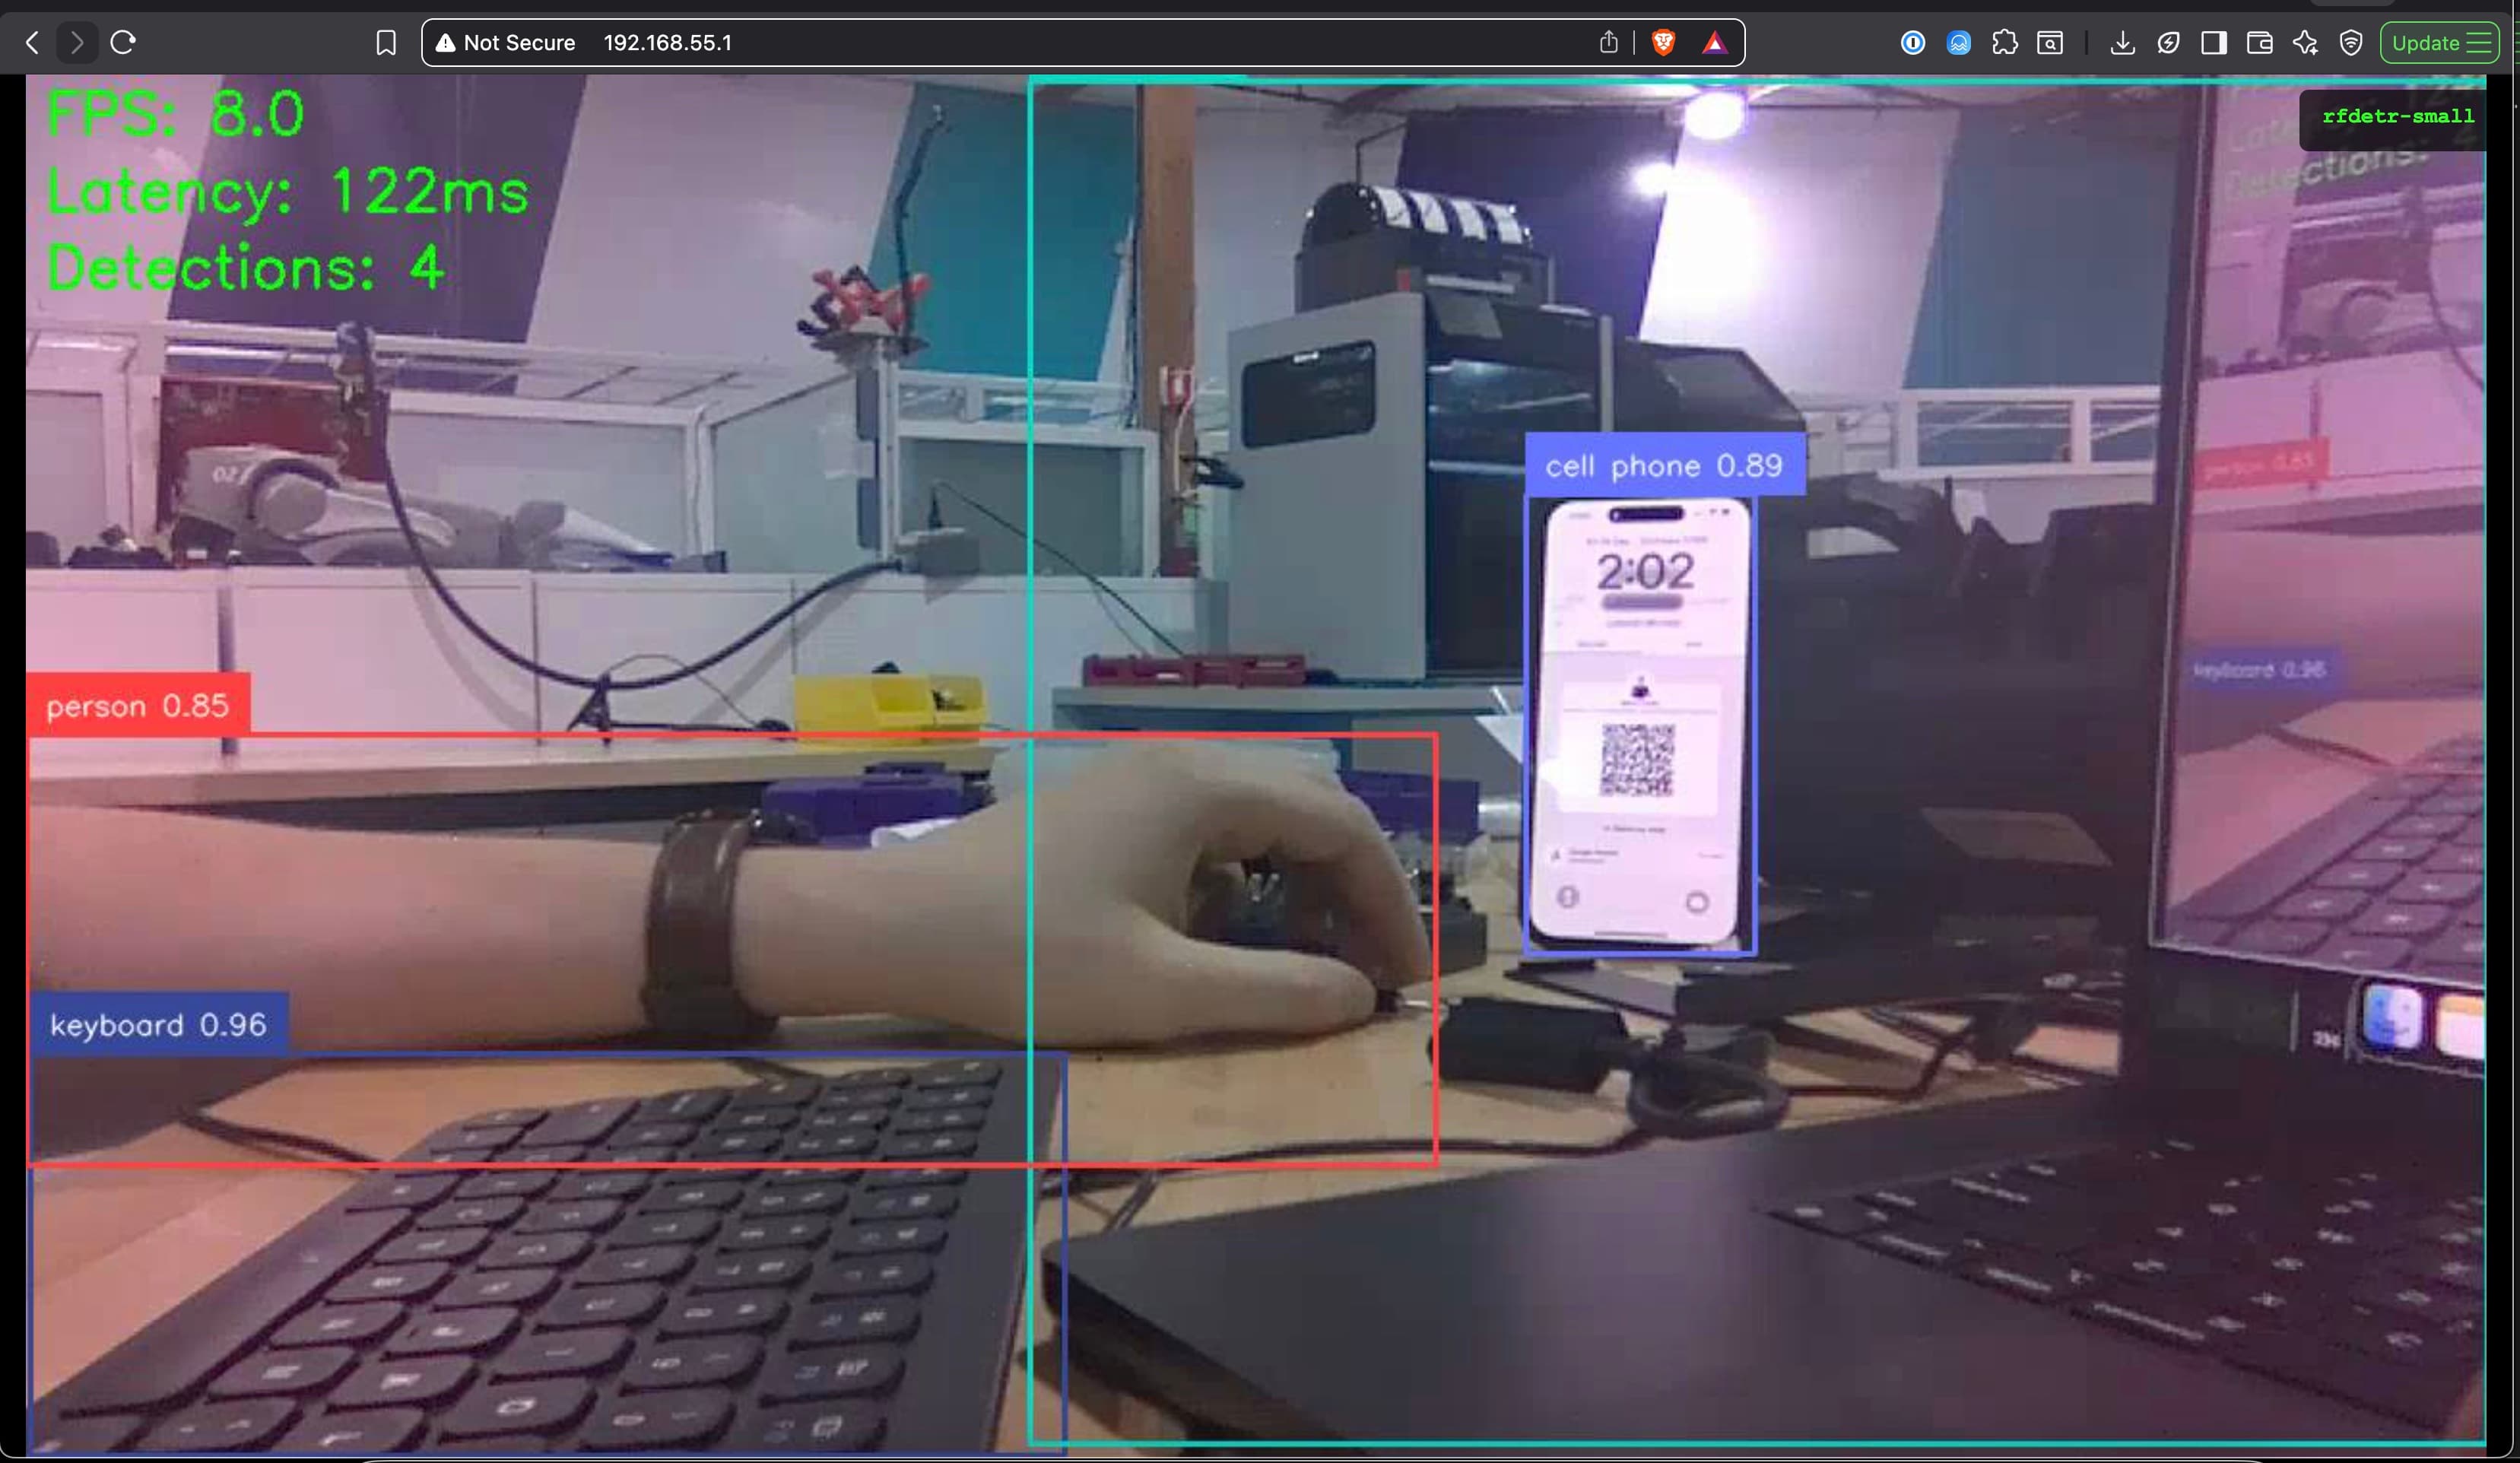
--port 8080Access the Stream:
- Open your browser:
http://<JETSON_IP>:5000 - View real-time object detection with bounding boxes and labels
- See FPS, latency, and detection count overlays
- IMU sensor visualization (if available)
Web Stream Features:
- Real-time MJPEG streaming - Low latency video feed
- Live annotations - Bounding boxes and labels drawn on video
- Performance metrics - FPS and latency displayed
- IMU integration - 3D orientation visualization (if IMU sensor connected)
- Model switching - Change models without restarting
Command Line Options:
python run_roboflow_web_stream.py --help

Options:
  --model MODEL_ID          Model to use (default: yolov11n-640)
  --rtsp-url URL            RTSP stream URL (default: rtsp://127.0.0.1:8554/cam0)
  --confidence THRESHOLD    Confidence threshold 0.0-1.0 (default: 0.5)
  --port PORT               Web server port (default: 5000)
  --inference-server URL    Inference server URL (default: http://localhost:9001)
  --no-imu                  Disable IMU sensor overlay
Downloading Additional Models
The Field Kit includes a script to download and cache additional models:
Download Pre-configured Models:
cd jetson-orin-nano-field-kit/apps/vision/roboflow
source venv/bin/activate

# Download all models from the pre-configured list
python download_models.py \
  --api-url http://localhost:9001 \
  --cache-dir /home/box/roboflow-cache
Available Models to Download:
yolov10n-640,yolov10s-640- YOLOv10 modelsyolov8m-640- YOLOv8 Mediumyolov8n-seg-640,yolov8s-seg-640- YOLOv8 segmentationyolov11s-seg-640- YOLOv11 Small segmentation
Check Downloaded Models:
# List models in cache
python download_models.py --list

# Output shows:
# - State file location
# - Cache directory
# - Cache size
# - List of downloaded models
Remove Models from Cache:
# Remove specific models (frees disk space, but keeps cache files)
python download_models.py --remove yolov8m-640 yolov10n-640
Testing Models
Test any model with a simple script:
cd jetson-orin-nano-field-kit/apps/vision/roboflow
source venv/bin/activate

# Test a model with an image
python test_model.py \
  --model rfdetr-small \
  --image test.jpg \
  --url http://localhost:9001 \
  --conf 0.5
Output includes:
- Model loading status
- Inference results
- Detection details (class, confidence, bounding boxes)
- Raw JSON response
Model Selection Guide
Choose the Right Model:
-
For Real-time Applications (30+ FPS):
- Use:
yolov11n-640oryolov8n-640 - Best for: Live video streams, low latency requirements
- Use:
-
For Balanced Performance (15-30 FPS):
- Use:
yolov11s-640,yolov8s-640, orrfdetr-nano - Best for: General purpose detection, good accuracy/speed trade-off
- Use:
-
For Maximum Accuracy (10-20 FPS):
- Use:
rfdetr-smallorrfdetr-medium - Best for: Critical applications where accuracy matters most
- Use:
-
For Segmentation Tasks:
- Use:
yolov11n-seg-640oryolov11s-seg-640 - Best for: Pixel-level masks, instance segmentation
- Use:
Performance Comparison:
| Model | FPS (approx) | mAP (COCO) | Memory |
|---|---|---|---|
| yolov11n-640 | 40-50 | 38.5 | Low |
| yolov11s-640 | 25-35 | 44.5 | Medium |
| rfdetr-nano | 30-40 | 42.0 | Low |
| rfdetr-small | 20-30 | 47.5 | Medium |
| rfdetr-medium | 15-25 | 50.2 | High |
Integration Examples
With OpenCV:
import cv2
from inference_sdk import InferenceHTTPClient

client = InferenceHTTPClient(api_url="http://localhost:9001")

cap = cv2.VideoCapture("rtsp://localhost:8554/cam0")

while True:
    ret, frame = cap.read()
    if not ret:
        break

    # Run inference
    result = client.infer(frame, model_id="yolov11n-640")

    # Draw bounding boxes
    for pred in result.get("predictions", []):
        x, y, w, h = pred["x"], pred["y"], pred["width"], pred["height"]
        cv2.rectangle(frame, (x, y), (x+w, y+h), (0, 255, 0), 2)
        cv2.putText(frame, f"{pred['class']} {pred['confidence']:.2f}",
                   (x, y-10), cv2.FONT_HERSHEY_SIMPLEX, 0.5, (0, 255, 0), 2)

    cv2.imshow("Detection", frame)
    if cv2.waitKey(1) & 0xFF == ord('q'):
        break

cap.release()
cv2.destroyAllWindows()
With Supervision (Advanced Annotations):
from inference_sdk import InferenceHTTPClient
import supervision as sv
import cv2

client = InferenceHTTPClient(api_url="http://localhost:9001")

# Create annotators
box_annotator = sv.BoxAnnotator()
label_annotator = sv.LabelAnnotator()

cap = cv2.VideoCapture("rtsp://localhost:8554/cam0")

while True:
    ret, frame = cap.read()
    if not ret:
        break

    # Run inference
    result = client.infer(frame, model_id="rfdetr-small")

    # Convert to Supervision format
    detections = sv.Detections.from_inference(result)

    # Filter by confidence
    detections = detections[detections.confidence >= 0.5]

    # Annotate
    annotated = box_annotator.annotate(scene=frame.copy(), detections=detections)

    labels = [f"{class_name} {conf:.2f}"
              for class_name, conf in zip(detections['class_name'], detections.confidence)]
    annotated = label_annotator.annotate(scene=annotated, detections=detections, labels=labels)

    cv2.imshow("Detection", annotated)
    if cv2.waitKey(1) & 0xFF == ord('q'):
        break

cap.release()
cv2.destroyAllWindows()
Troubleshooting
Server Not Starting:
# Check Docker logs
docker logs rf-inference

# Check if port 9001 is in use
sudo netstat -tlnp | grep 9001

# Restart the service
sudo systemctl restart roboflow.service
Model Not Loading:
# Check if model is in cache
ls -la /home/box/roboflow-cache/

# Manually load model
python download_models.py --api-url http://localhost:9001

# Check server logs
docker logs rf-inference | tail -50
Low Performance:
- Ensure GPU is being used: Check
docker logs rf-inferencefor TensorRT/CUDA messages - Try a smaller model: Use
yolov11n-640instead ofrfdetr-medium - Reduce input resolution: Models use 640x640 by default
- Check system resources:
sudo tegrastats
Connection Errors:
# Verify server is accessible
curl http://localhost:9001/health

# Check firewall
sudo ufw status

# Test from another machine
curl http://<JETSON_IP>:9001/health
Best Practices
- Model Caching: Models are cached locally - download once, use offline
- GPU Acceleration: The server automatically uses TensorRT and CUDA when available
- Confidence Thresholds: Adjust based on your use case (0.5 is a good default)
- Batch Processing: Process multiple frames together when possible
- Model Selection: Start with
yolov11n-640for speed, upgrade torfdetr-smallfor accuracy - Resource Management: Monitor GPU memory and temperature during extended use
Additional Resources
- Roboflow Documentation
- Roboflow Inference Server
- Roboflow Docker Image for Jetpack 6.2 - Official Docker image optimized for Jetson Orin Nano with Jetpack 6.2
- Roboflow Jetpack 6.2 Support Announcement - Details on Roboflow's specialized Docker image for Jetpack 6.2
- Model Performance Benchmarks
- Field Kit Vision Applications
Running Pre-trained Models
YOLOv8 via Docker (Alternative):
# Use pre-configured Ultralytics Docker container
docker pull ultralytics/ultralytics:latest-jetson-jetpack6
docker run -it --ipc=host --runtime=nvidia ultralytics/ultralytics:latest-jetson-jetpack6
Real-time Video Processing
Basic Video Stream
import cv2

def process_frame(frame):
    # Your processing logic here
    return frame

cap = cv2.VideoCapture(0)

while True:
    ret, frame = cap.read()
    if not ret:
        break

    processed = process_frame(frame)
    cv2.imshow('Video', processed)

    if cv2.waitKey(1) & 0xFF == ord('q'):
        break

cap.release()
cv2.destroyAllWindows()
GPU-Accelerated Processing
import cv2
import numpy as np

# Create GPU matrices
gpu_frame = cv2.cuda_GpuMat()

cap = cv2.VideoCapture(0)

while True:
    ret, frame = cap.read()
    if not ret:
        break

    # Upload to GPU
    gpu_frame.upload(frame)

    # Process on GPU
    gpu_gray = cv2.cuda.cvtColor(gpu_frame, cv2.COLOR_BGR2GRAY)

    # Download result
    result = gpu_gray.download()

    cv2.imshow('Video', result)

    if cv2.waitKey(1) & 0xFF == ord('q'):
        break

cap.release()
cv2.destroyAllWindows()
Stereo Vision
The Field Kit includes dual IMX219 cameras configured for stereo vision. Use the included stereo disparity script:
# Run stereo disparity from Field Kit repository
cd jetson-orin-nano-field-kit/apps/vision/roboflow
source venv/bin/activate
python run_stereo_disparity.py
Depth Estimation
Manual Stereo Vision Example:
import cv2
import numpy as np

# Initialize stereo matcher
stereo = cv2.StereoBM_create(numDisparities=16, blockSize=15)

# Capture from both cameras (CAM0 and CAM1)
cap_left = cv2.VideoCapture(0)   # CAM0 (left)
cap_right = cv2.VideoCapture(1)  # CAM1 (right)

# Or use RTSP streams
# cap_left = cv2.VideoCapture('rtsp://localhost:8554/cam0')
# cap_right = cv2.VideoCapture('rtsp://localhost:8554/cam1')

while True:
    ret_left, frame_left = cap_left.read()
    ret_right, frame_right = cap_right.read()

    if not (ret_left and ret_right):
        break

    # Convert to grayscale
    gray_left = cv2.cvtColor(frame_left, cv2.COLOR_BGR2GRAY)
    gray_right = cv2.cvtColor(frame_right, cv2.COLOR_BGR2GRAY)

    # Compute disparity
    disparity = stereo.compute(gray_left, gray_right)

    # Normalize for display
    disparity_normalized = cv2.normalize(disparity, None, 0, 255, cv2.NORM_MINMAX)

    cv2.imshow('Disparity', disparity_normalized.astype(np.uint8))

    if cv2.waitKey(1) & 0xFF == ord('q'):
        break

cap_left.release()
cap_right.release()
cv2.destroyAllWindows()
Performance Optimization
Multi-threading
import threading
import queue
import cv2

class VideoCaptureThread:
    def __init__(self, src=0):
        self.cap = cv2.VideoCapture(src)
        self.q = queue.Queue()
        self.running = True

    def start(self):
        threading.Thread(target=self._reader, daemon=True).start()
        return self

    def _reader(self):
        while self.running:
            ret, frame = self.cap.read()
            if not ret:
                break
            if not self.q.empty():
                try:
                    self.q.get_nowait()
                except queue.Empty:
                    pass
            self.q.put(frame)

    def read(self):
        return self.q.get()

    def stop(self):
        self.running = False
        self.cap.release()

# Usage
cap = VideoCaptureThread(0).start()

while True:
    frame = cap.read()
    # Process frame
    cv2.imshow('Video', frame)

    if cv2.waitKey(1) & 0xFF == ord('q'):
        break

cap.stop()
cv2.destroyAllWindows()
Batch Processing
import cv2
import numpy as np

def process_batch(frames):
    # Process multiple frames together
    results = []
    for frame in frames:
        # Your processing logic
        results.append(processed_frame)
    return results

# Collect frames
batch_size = 4
frames = []

cap = cv2.VideoCapture(0)

while True:
    ret, frame = cap.read()
    if not ret:
        break

    frames.append(frame)

    if len(frames) == batch_size:
        results = process_batch(frames)
        for result in results:
            cv2.imshow('Video', result)
            cv2.waitKey(1)
        frames = []

    if cv2.waitKey(1) & 0xFF == ord('q'):
        break

cap.release()
cv2.destroyAllWindows()
Common Vision Tasks
Object Detection
See the YOLOv8 example above for object detection.
Face Detection
import cv2

# Load Haar Cascade
face_cascade = cv2.CascadeClassifier(cv2.data.haarcascades + 'haarcascade_frontalface_default.xml')

cap = cv2.VideoCapture(0)

while True:
    ret, frame = cap.read()
    if not ret:
        break

    gray = cv2.cvtColor(frame, cv2.COLOR_BGR2GRAY)
    faces = face_cascade.detectMultiScale(gray, 1.1, 4)

    for (x, y, w, h) in faces:
        cv2.rectangle(frame, (x, y), (x+w, y+h), (255, 0, 0), 2)

    cv2.imshow('Faces', frame)

    if cv2.waitKey(1) & 0xFF == ord('q'):
        break

cap.release()
cv2.destroyAllWindows()
Motion Detection
import cv2
import numpy as np

cap = cv2.VideoCapture(0)
background = None

while True:
    ret, frame = cap.read()
    if not ret:
        break

    gray = cv2.cvtColor(frame, cv2.COLOR_BGR2GRAY)
    gray = cv2.GaussianBlur(gray, (21, 21), 0)

    if background is None:
        background = gray
        continue

    diff = cv2.absdiff(background, gray)
    thresh = cv2.threshold(diff, 25, 255, cv2.THRESH_BINARY)[1]
    thresh = cv2.dilate(thresh, None, iterations=2)

    contours, _ = cv2.findContours(thresh.copy(), cv2.RETR_EXTERNAL, cv2.CHAIN_APPROX_SIMPLE)

    for contour in contours:
        if cv2.contourArea(contour) < 500:
            continue
        (x, y, w, h) = cv2.boundingRect(contour)
        cv2.rectangle(frame, (x, y), (x+w, y+h), (0, 255, 0), 2)

    cv2.imshow('Motion', frame)

    if cv2.waitKey(1) & 0xFF == ord('q'):
        break

cap.release()
cv2.destroyAllWindows()
Next Steps
- Learn about Voice Assistant integration
- Explore LLM capabilities for vision-language models
- Check Troubleshooting for common vision issues
- Review Good Guidance for optimization tips